By Simon Stevens, PowerFlex Engineering Technologist, EMEA. November 2021.
In a previous blog, https://powerflex.me/2021/05/13/a-beginners-guide-to-rest-api-calls-with-powerflex/, I presented a “beginners guide” on how to issue RESTful API calls to a PowerFlex system. Just to recap, with any PowerFlex 3.x deployment, a PowerFlex Gateway will be installed as part of the deployment. It is the Gateway that is used as the REST end point for issuing API calls to the PowerFlex system. Once we have authenticated with the MDM via the gateway and received an authentication token, we can then issue RESTful calls to the PowerFlex system and are able to do anything that can be performed via issuing PowerFlex scli commands. Many customers find the use of RESTful calls the best way to integrate their IT infrastructure into their tooling and automation platforms, whether these are COTS packages or customised/home-built management solutions.
At the end of the previous blog, I promised to revisit this topic at some point in the future and was duly reminded of my promise last week, thanks to a Proof of Concept (POC) for a large EMEA customer that is currently taking place within our Cork Customer Solutions Center. As part of this POC, there was a specific ask that we demonstrated the use of RESTful calls for several common storage administration activities. So what better time to revisit the topic than now, using some of the test activities that were requested by a real customer?
I always enjoy getting involved with customer POCs, as there is always something to learn from our customers. Even when dealing with the ask to go through what is effectively a list of “Storage Admin Basic Tasks 101”, it can still be reaffirming to see how customers handle these basics and see what is important to them. The use case for this POC was heavily dependent upon the performance capabilities of PowerFlex even when multiple snapshots were active against hundreds of multi-TB volumes, but we also needed to prove that the system could integrate with the customers’ existing management system which uses REST calls to administer everything.
So, having been presented with the list of tests that the customer wished us to demonstrate to them, I was not at all surprised to see that common storage provisioning tasks were included on the list. This being the case, I thought that I would use this blog to show the REST calls that we used in order to perform these basic provisioning tasks, again with the aim of helping those who are new to this topic. As with my previous blog, I choose to use Chrome plus the RESTED chrome extension to issue the calls. RESTED is available as an extension for a number of browsers and also documents historic calls, making it easy if one needs to go back and reissue previous commands again – which I often need to do if the authentication token has expired and so I need to get a new token by issuing the /api/login command yet again!
With this in mind, I will go through the steps needed to perform the following common PowerFlex storage provisioning tasks using REST calls. We will create storage by creating a volume, mapping that volume to a host and then creating a snapshot of the volume. Then we will perform the reverse steps – removing the snapshot volume, unmapping the storage volume from the host SDC and then finish by deleting the volume entirely.
Test 1 – Creating a PowerFlex Volume Via REST
Creating storage volumes is obviously going to be a common ask, more so for dynamic environments where containers and their persistent storage claims get created and then destroyed all of the time. To create a new PowerFlex volume, we must issue the /api/types/Volume/instances command using the POST method. We need to pass parameters to the command using json content type and must also pass the authentication token that is created by performing the pre-requisite PowerFlex Gateway login authentication step. By default we have to specify at least the volume size, either in KB or GB, plus we must also state which Storage Pool the volume will be created in. We can also pass optional parameters to the call, such as giving the volume a name. So in my example below, I decided to create a 16GB volume called “Simon_vol02”, from a StoragePool with the ID “f744fbf500000000”:
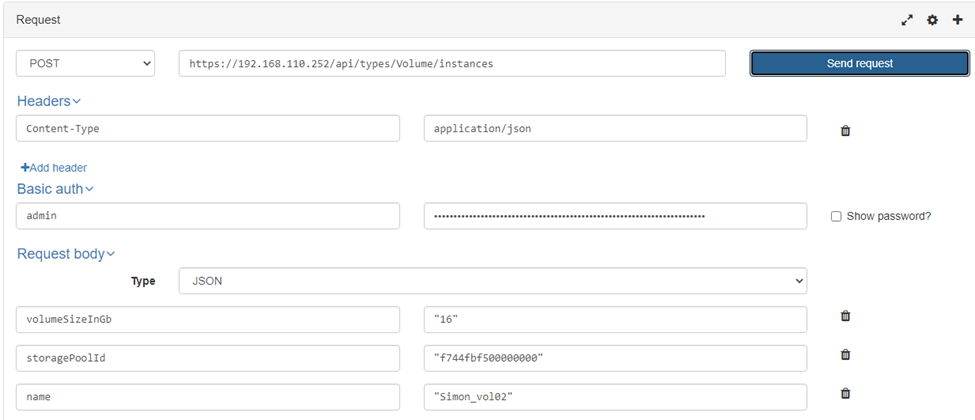
We receive the ID of the newly created volume, “simon_vol02”, as part of the success response back from issuing this command (in this case, the volume ID was “6ec26ae800000092” – we will need to refer to this in a few moments).
Test 2 – Mapping a PowerFlex Volume To a Client Via REST
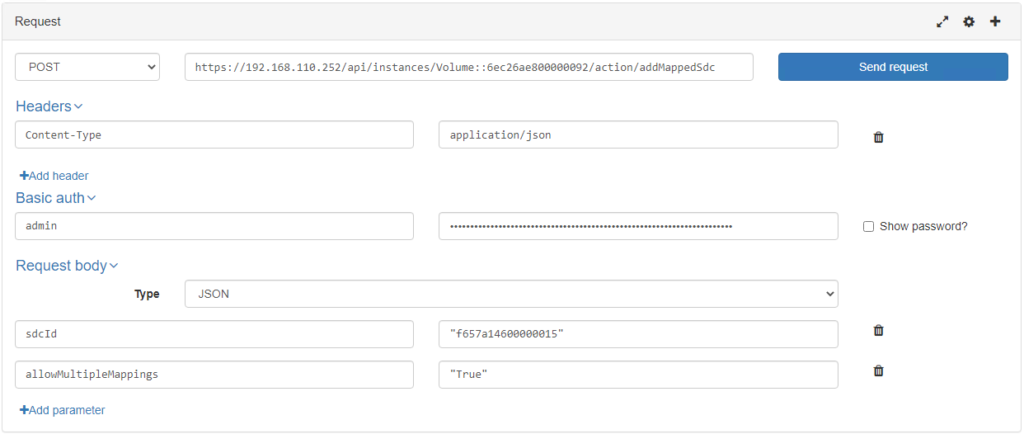
Having created a volume, we now need to present it to a client, so that the client will be able to use the volume. Each PowerFlex client requires an SDC to be installed on the client, hence we need to map the volume to the SDC. While we humans identify each SDC by its name, we need to use the SDC ID, which is a 16-digit hex string, when issuing REST API calls, so we also need to ensure that we have this to hand. We can use the /api/types/Sdc/instances REST command (GET) to find out the SDC ID of any particular SDC, then use the /api/instances/Volume::{id}/action/addMappedSdc command (POST) to map the a specific volume ID to the SDC of interest.
The /api/types/Sdc/instances command is the RESTful equivalent of issuing the scli –query_all_sdc PowerFlex command. Once issued, it returns a list of all SDCs in the system, along with details such as their IP addresses, the OS of the SDC node, the SDC version and, most importantly for our use here, the SDC ID. In my lab environment, I am looking to map the volume “Simon_vol02” – volume ID “6ec26ae800000092” that was created in Test 1 above – to a test SDC called “centos8vm01”, which has the SDC ID of “f657a14600000015”. We need to pass the SDC ID as a parameter, plus I always enable the “allowMultipleMappings” flag as doing so allows us to map a volume to multiple SDCs, which is required if you are mapping a volume to multiple nodes in a cluster.
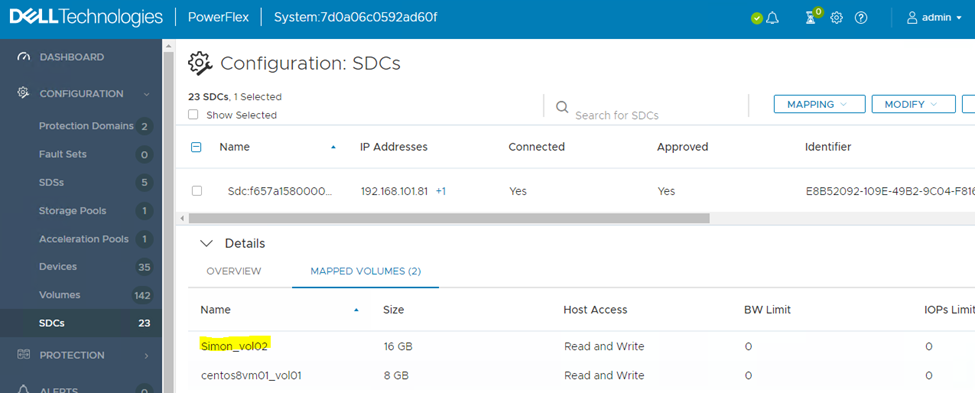
One successful request later and we will receive an HTTP 200 Status as our success response. However, I can also check this out quickly by looking at my SDC from the PowerFlex GUI and checking to see if the volume “Simon_vol02” is now mapped to this host – it can be clearly seen in the figure below:
Test 3 – Creating a Snapshot against a PowerFlex volume
Having created a volume and mapped it out to an SDC client, we are going great guns! Now we will take a snapshot of our newly created “Simon_vol02” volume. We use the following POST command to create a snapshot: /api/instances/System::{id}/action/snapshotVolumes . Note that we need to call the correct PowerFlex System ID as that is part of the command itself that is being used. If we do not know this, it can be easily discovered by issuing the /api/types/System/instances/action/queryIdByKey POST command. My test system has the System ID of “7d0a06c0592ad60f”.
We must also provide a list of Volume ID & Snapshot name pairings, as these are required parameters to the snapshotVolumes call. So for this test I decided to create a Snapshot volume called “Simon_Snap” against our volume “Simon_Vol02”; hence the following REST call is required:
/api/instances/System::7d0a06c0592ad60f/action/snapshotVolumes
POST
{“snapshotDefs”:[{“volumeId”:”6ec26ae800000092″, “snapshotName”:”Simon_Snap”}]
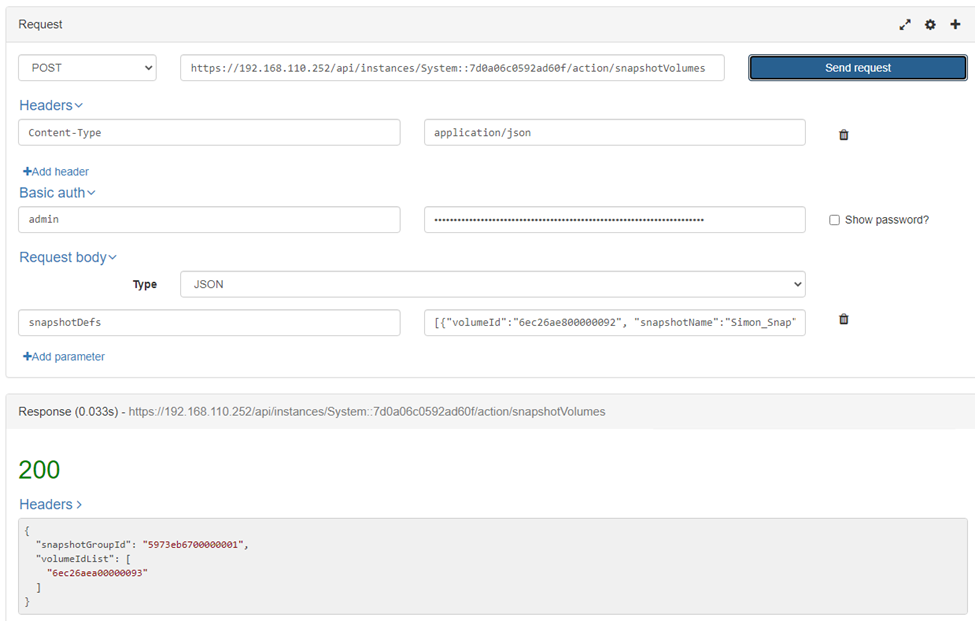
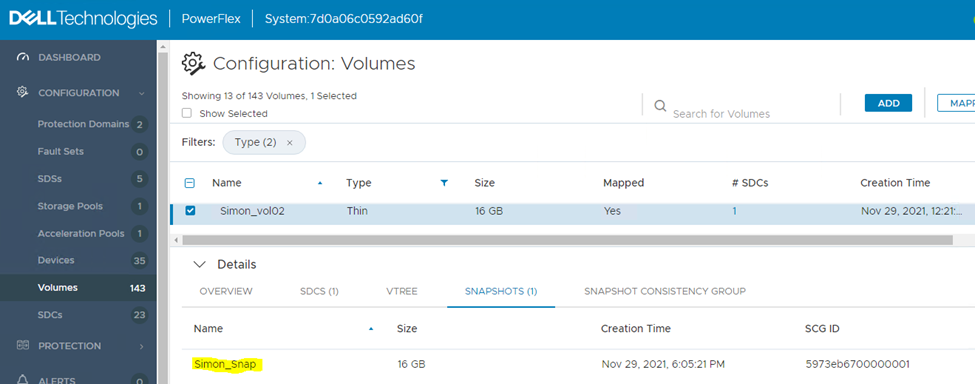
Note that as part of the success response, we were passed back a Snapshot Group ID and a list of the snapshot volumes that were created. Of course, we only created one snapshot volume in our example here, so the list contains just the one snapshot volume ID, 6ec26aea00000093. We can also check to see that the snapshot has been created by looking in the PowerFlex GUI – when we select the volume “Simon_vol02”, we should be able to see the newly created Snapshot volume that has now been paired with it:
Test 4 – Undoing What We have Just Created….
Having successfully created a volume, mapped it to a host and created a snapshot, we can all agree that we have now covered the basic storage creation tasks. To end this blog, we need to be able to undo those steps as well – we need to be able to remove snapshots, unmap volumes from hosts and then finally remove those volumes. So let us take a look at the REST calls that cover these steps.
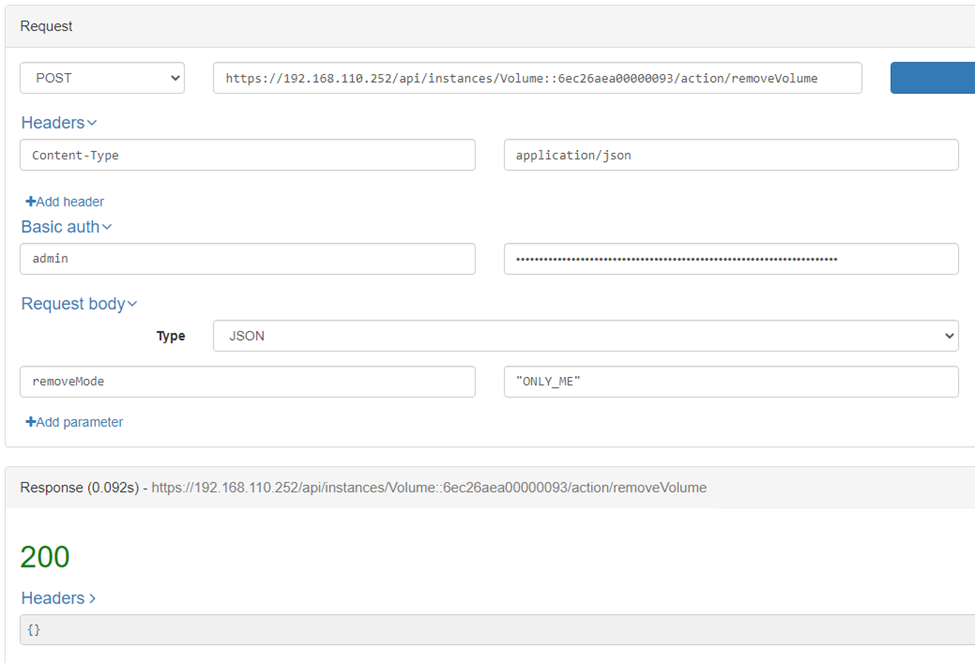
With PowerFlex, a snapshot is just another volume, so the same REST API call is used to remove both volumes and snapshots. We must have the volume ID of any volume that we wish to remove. We know that the Snapshot Volume ID for “Simon_Snap” is “6ec26aea00000093”, this ID must be fed into the /api/instances/Volume::{id}/action/removeVolume call, which uses a POST method and requires the “removeMode” parameter to be passed to the call. In this instance we will set the parameter to “ONLY_ME” because we only want to remove this volume. However, if we wanted to remove a complete subtree of snapshot volumes, we could use another parameter setting, such as “DESCENDANTS_ONLY” which removes all of the snapshot descendants in one go.
Once again, we can check the PowerFlex GUI to see if “Simon_Snap” has indeed been removed from the system – see figure 7 below and note the lack of snapshots in the “Details” window:

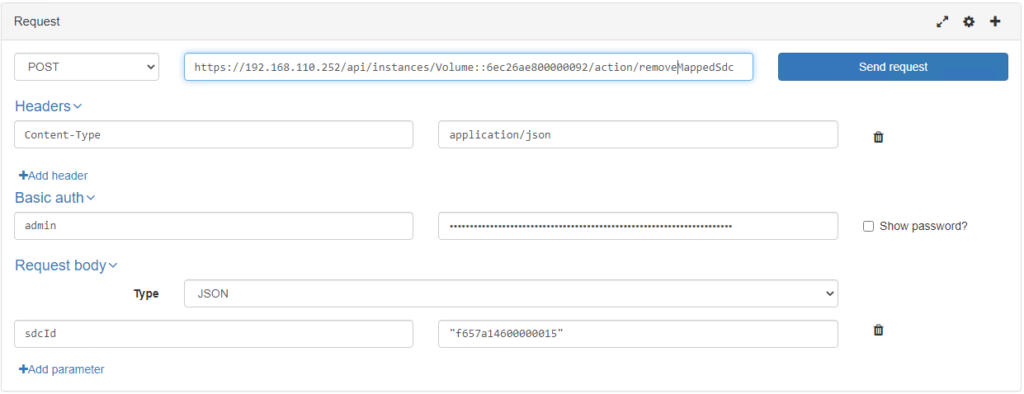
Now that we have shown that we know how to remove snapshots using REST API calls, we can use the same call against regular PowerFlex volumes as well. However, we need to unmap a volume from any SDC that the volume is mapped against before we can proceed with removing the volume. We can achieve this using the /api/instances/Volume::{id}/action/removeMappedSdc command, which removes a volume from being mapped to one or all SDCs. We need to run this against the “Simon_Vol02” volume, which has the Volume ID “6ec26ae800000092”. We also need to pass the SDC ID we wish to remove the volume from as the required parameter. In this case, this is the SDC ID “f657a14600000015” that we used previously (SDC host centos8vm01):
And again, we can check to see if the unmap command was successful from the PowerFlex GUI –
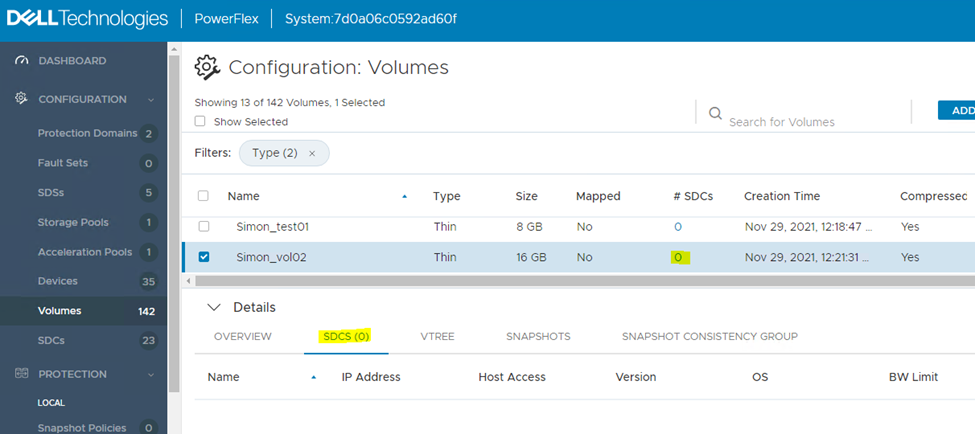
Now that we have unmapped “Simon_vol02” from all SDCs, we will be allowed to remove the volume. This uses the same REST API call that we used to remove the snapshot volume earlier, all we have to do is refer to the correct volume ID – 6ec26ae800000092 – prior to issuing the call to remove this particular volume – /api/instances/Volume::6ec26ae800000092/action/removeVolume . remember that we also need to pass the “removeMode” parameter set to “ONLY_ME”. As this is exactly the same command as shown in figure 6 earlier, there is little point in showing it again with just the different Volume ID to show for it. Instead, let us confirm again that the remove volume command worked by checking to see if I can find the Volume “Simon_vol02” from the list of volumes as seen using the PowerFlex GUI:
As can be seen from Figure 10 – “Simon_vol02” has indeed been removed, leaving not a trace of that volume nor the snapshot that we had also created and then removed.
Hopefully, the contents of this blog have shown how easy it is use the PowerFlex REST API calls to perform basic storage management tasks. Indeed, the whole POC session on REST API calls took about 90 minutes to demonstrate to the satisfaction of the customer, who wanted to see the storage provisioning steps above performed, as well as a demonstration of performance and capacity reporting through use of REST API calls. I will close this blog having focused on just the basic storage provisioning tasks – but I may well visit the performance and capacity reporting topic in a future blog!