My colleague Matt Hobbs and I have recently been working on getting this setup working, so without any further ado, here’s what we have learned:
Adding LDAP/Active Directory Authentication to PowerFlex Manager
This article provides simple steps to add existing Active Directory users to PowerFlex Manager for Authentication.
Before you start, ensure that the Active Directory is set up and ready for authentication and complete the following Prerequisites:
- PowerFlex Manager has DNS and NTP defined (Secure LDAP is sensitive to the DNS resolution, you must not skip this).
- PowerFlex Manager can reach to the Domain controller on port (389 for plain, 636 for SSL).
- Upload the Domain controller’s SSL certificates for Secure LDAP (steps are added in the later part of this article)
- Users and Groups are setup.
- Take a note of the OU, and Base DN – you can use ADSI edit tool to determine, steps are added in the later of this article.
- Determine the required AD fields such as User Account, First name, Last Name and mail AD attributes from the ADSI Edit (Instructions are added in the later section of this article).
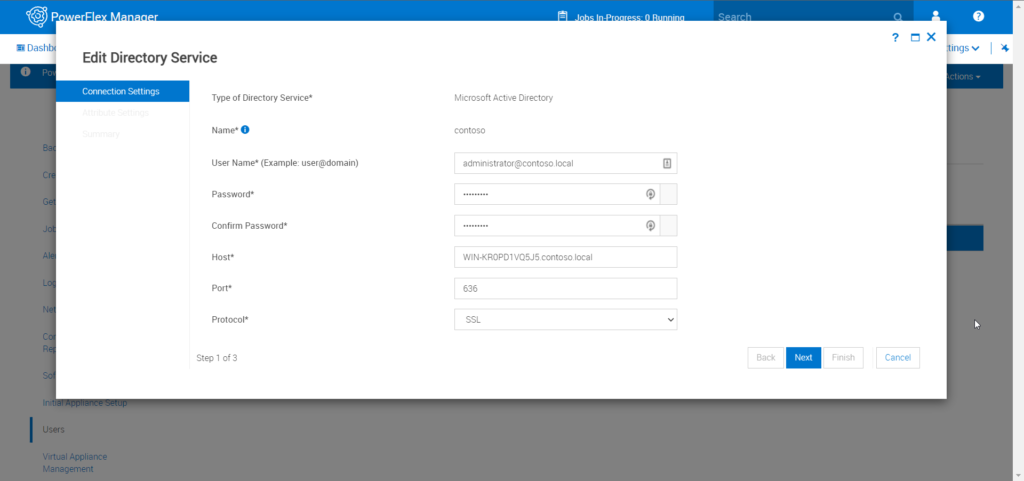
Step 1: Log in to PowerFlex Manager with admin or a user who has “Administrator” role. Click on Settings->Users->Directory Services
Step 2: Now to define a new directory definition click on Create, it will launch Create Directory Service Wizard, add AD credentials, password, Domain controllers FQDN (must for SSL) address, TCP Port, and the protocol (SSL or Plain).
Please also ensure for the User Name that are you using the full domain name, for example “administator@contoso.local”, and not just “administrator”.
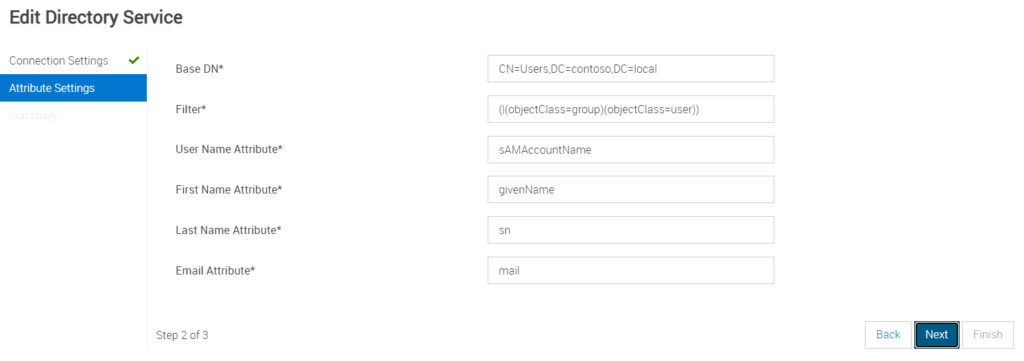
Step 3: Step 2 of the Wizard, Add Base DN, Filter, and other Attributes for the Active Directory
Attribute Settings
Base DN*: CN=Users,DC=contoso,DC=local
Filter*: (|(objectClass=group)(objectClass=user))
User Name Attribute*: sAMAccountName
First Name Attribute*: givenName
Last Name Attribute*: sn
Email Attribute*: mail
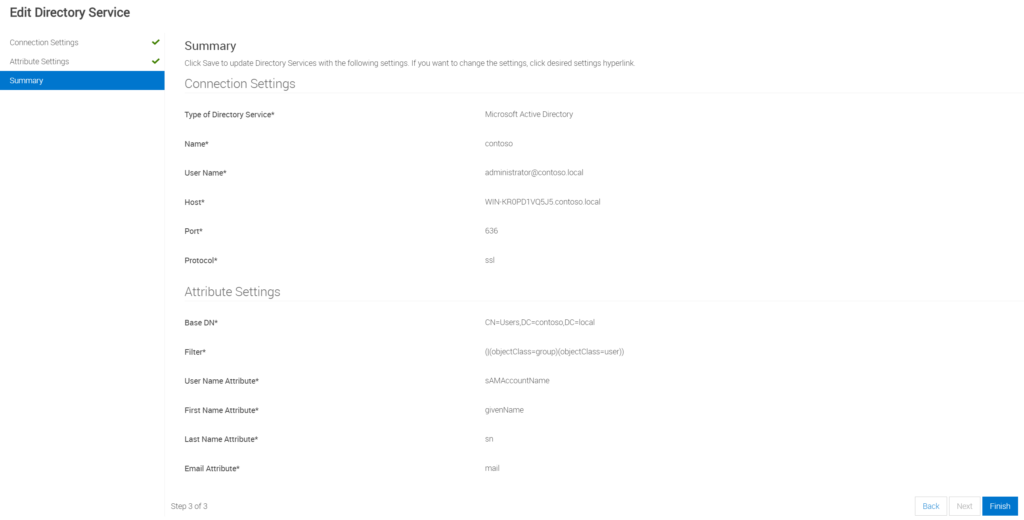
Step 4: Review the Summary of the config before finish
Step 4 : Click on Settings->Users->Import Active Directory Users
Step 5: Select the newly added Directory Services and try searching the added users/groups it will display the matching users, select the users that you would like, and choose the appropriate role
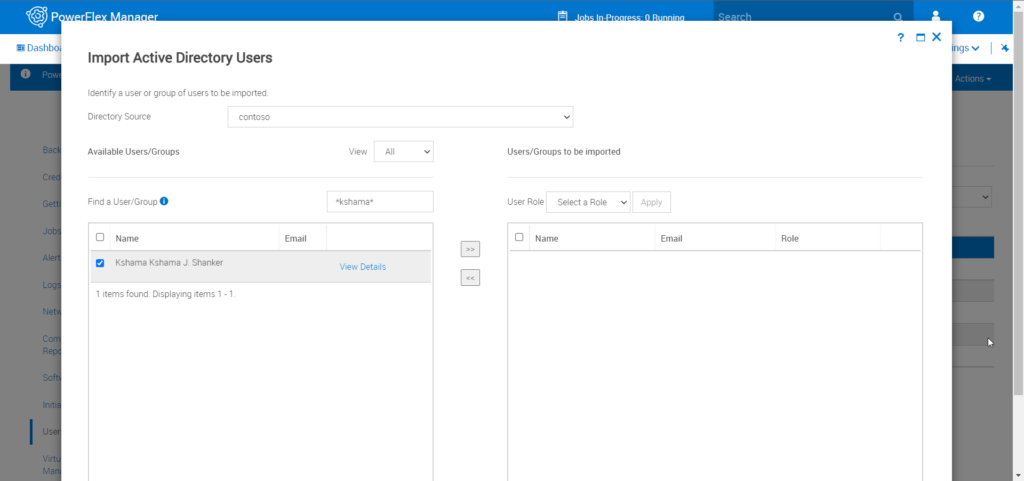
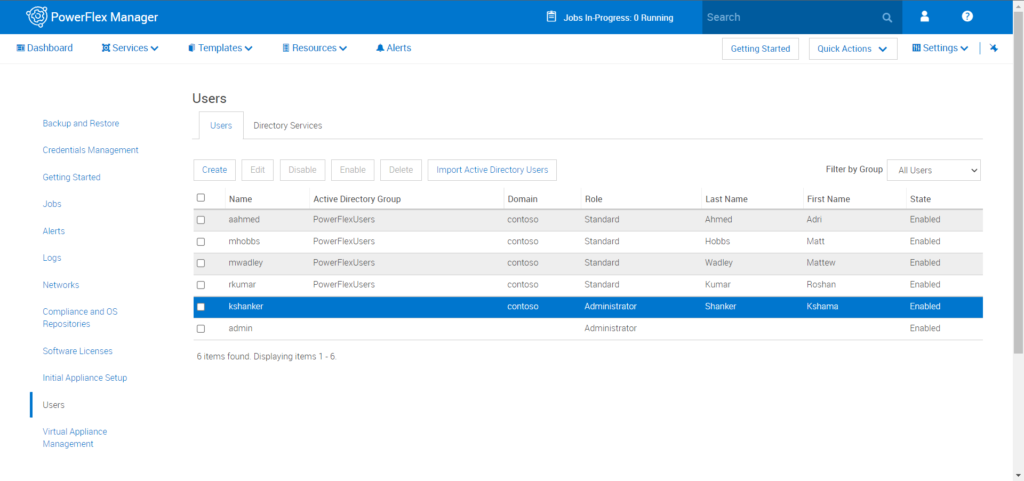
Step 6: Select one of multiple users/groups and their desired role and click on save. Once the saved list of the users will be displayed in Settings->Users
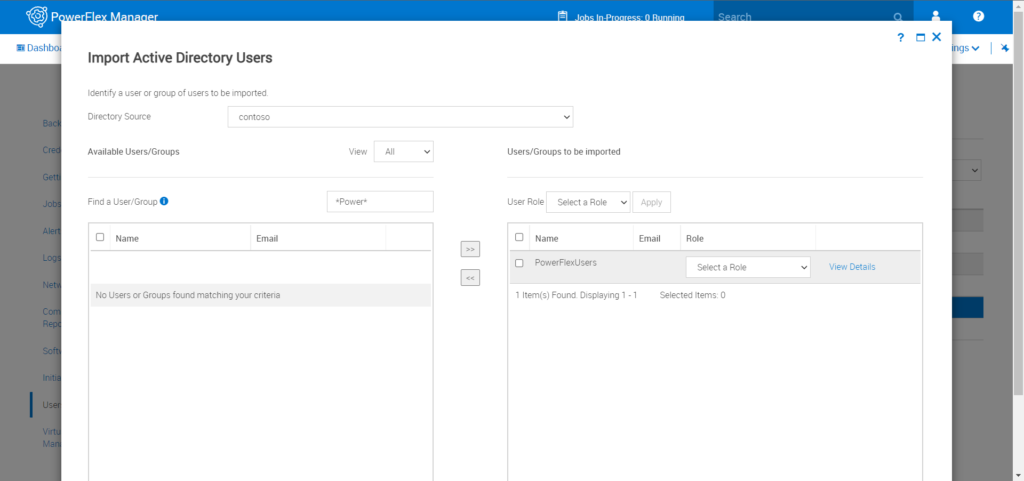
Step 7: Alternatively you can search for the group and select it, this will add all the users in the group to the PowerFlex Manager users with the role you have selected, if some of the users already exist in the PowerFlex system it will not overwrite
Step 8: Now you can log off and log in back with the newly added user to verify:
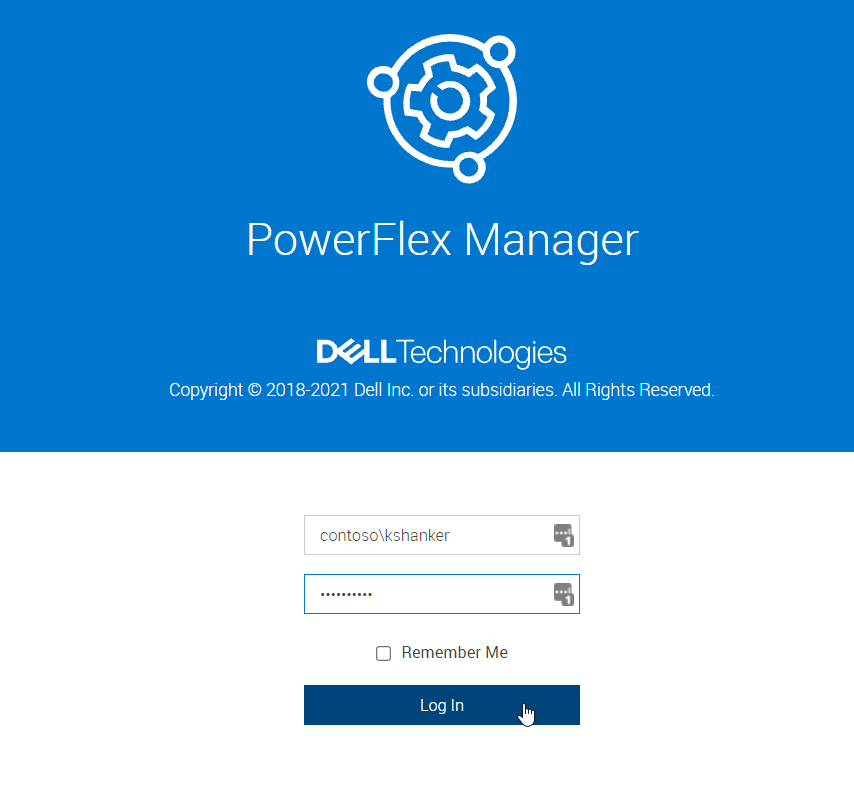
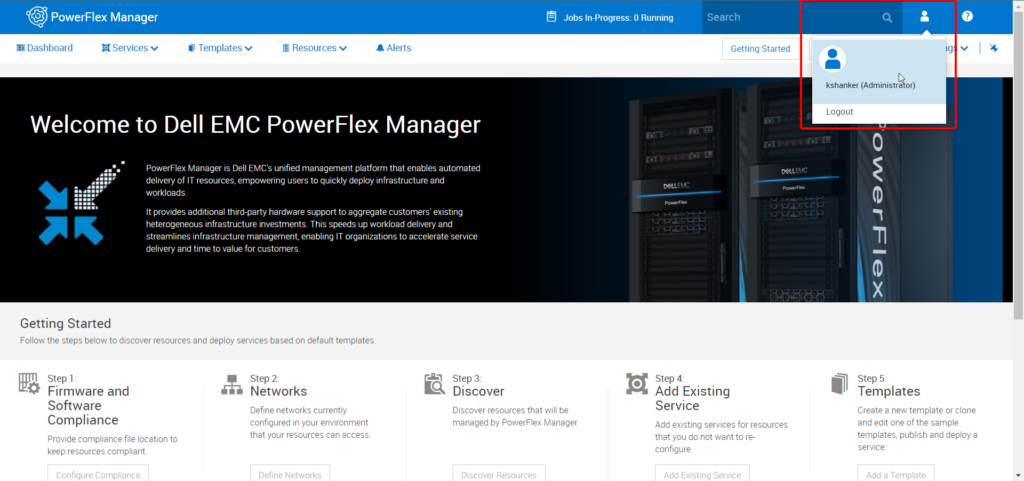
Step 9: You can verify by clicking on the user icon located at the top right corner of the screen
Following Things to Note:
- Adding new users to the AD group will requires a re-import.
- If you would like to remove a user from the AD group you should remove from both AD and PowerFlex Manager.
- DNS configuration for PowerFlex manager is must, use domain controller’s FQDN all the time.
- Upload the Domain controller’s SSL certificates for Secure LDAP
How to upload the SSL Certificates to PowerFlex Manager
Step 1: Log in to one of the domain controllers and launch mmc utility and add certificates authority snap-in.
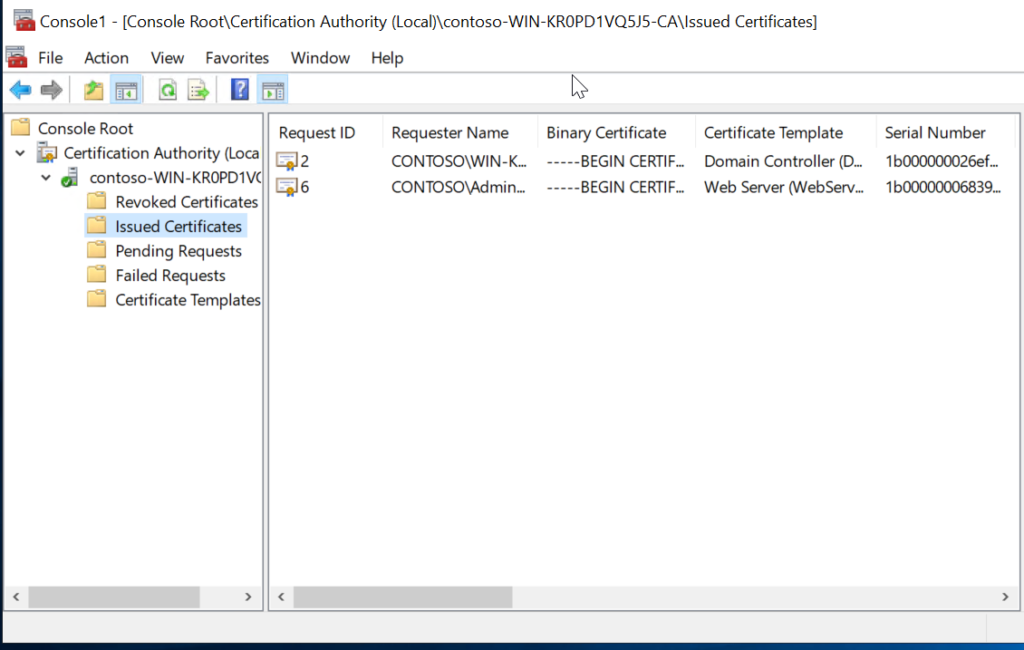
Step 2: Locate the domain controllers issued certificates and click on Certificate->Details

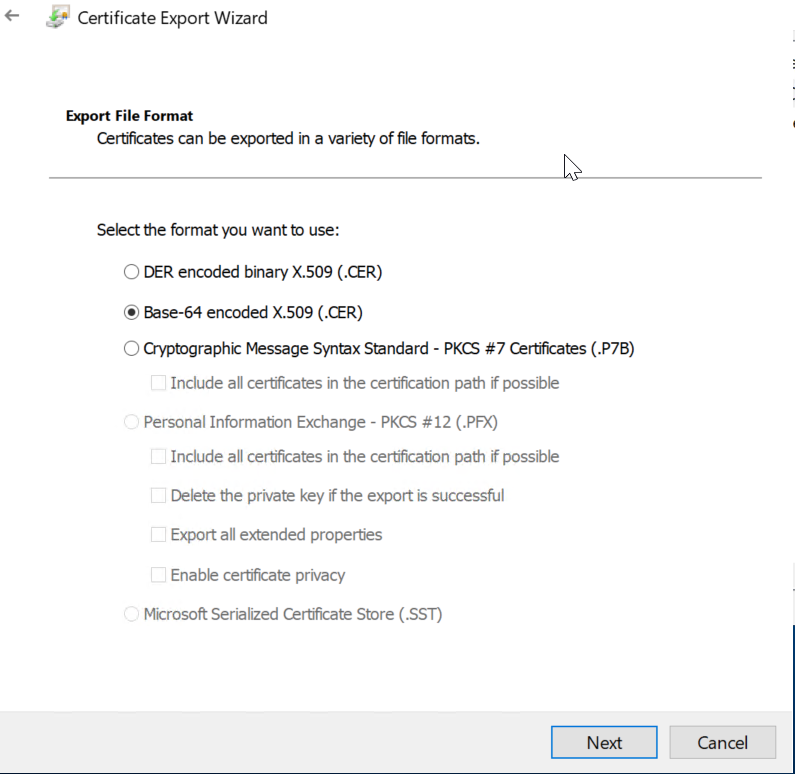
Step 3: Click on Copy to File to export the certificate and select Base-64 encoded X.509 format
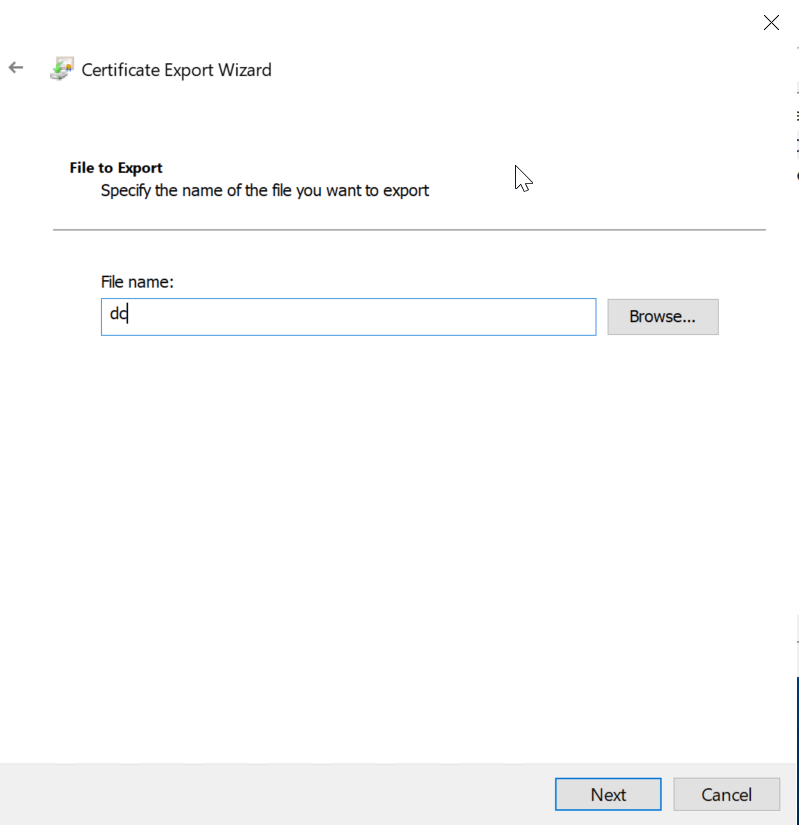
Step 4: input the file name and save it certificate file
Step 5: Now login to PowerFlex Manager – Click on Settings-> Virtual Appliance Management
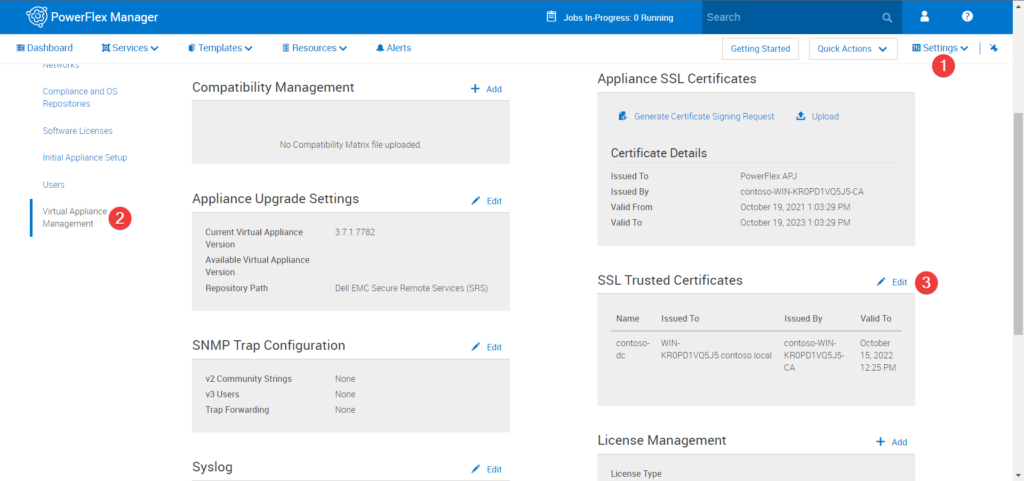
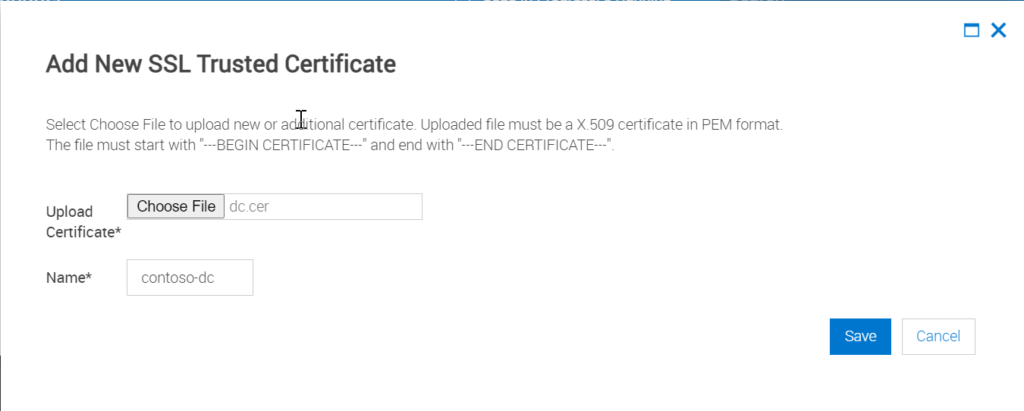
Step 6: Click Edit on the SSL Trusted Certificates and add New SSL certificates
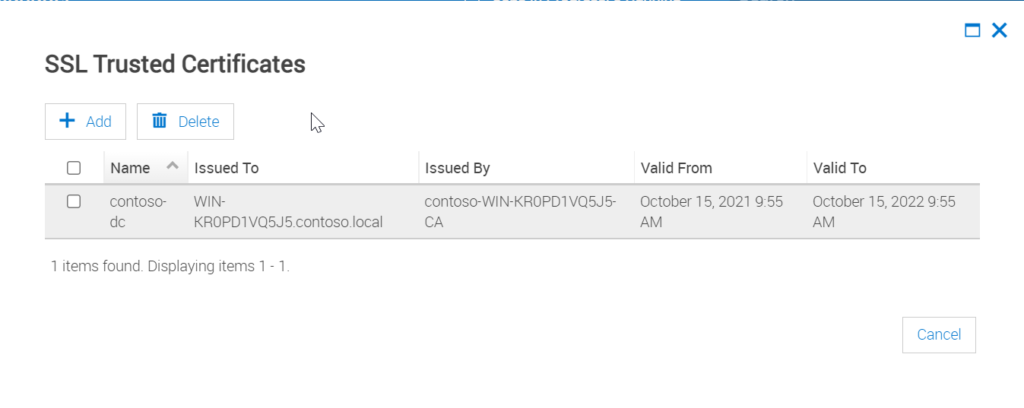
Step 7: Once SSL upload is successful it will be listed as below
How to verify the AD Parameters
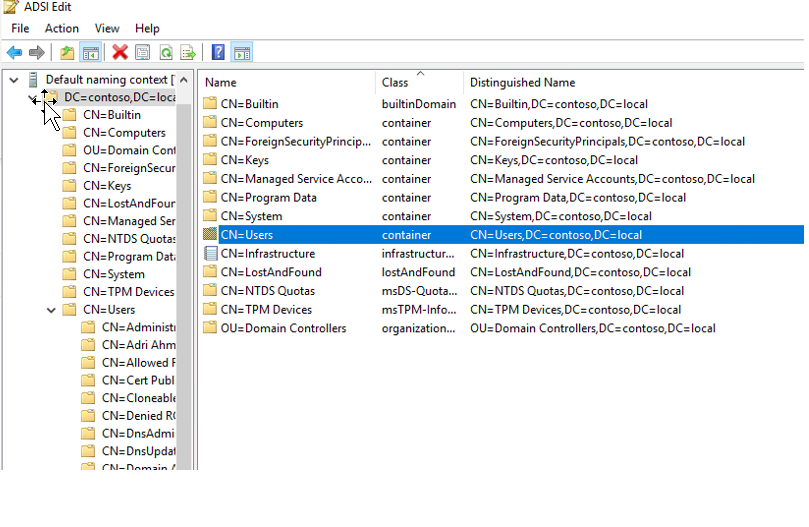
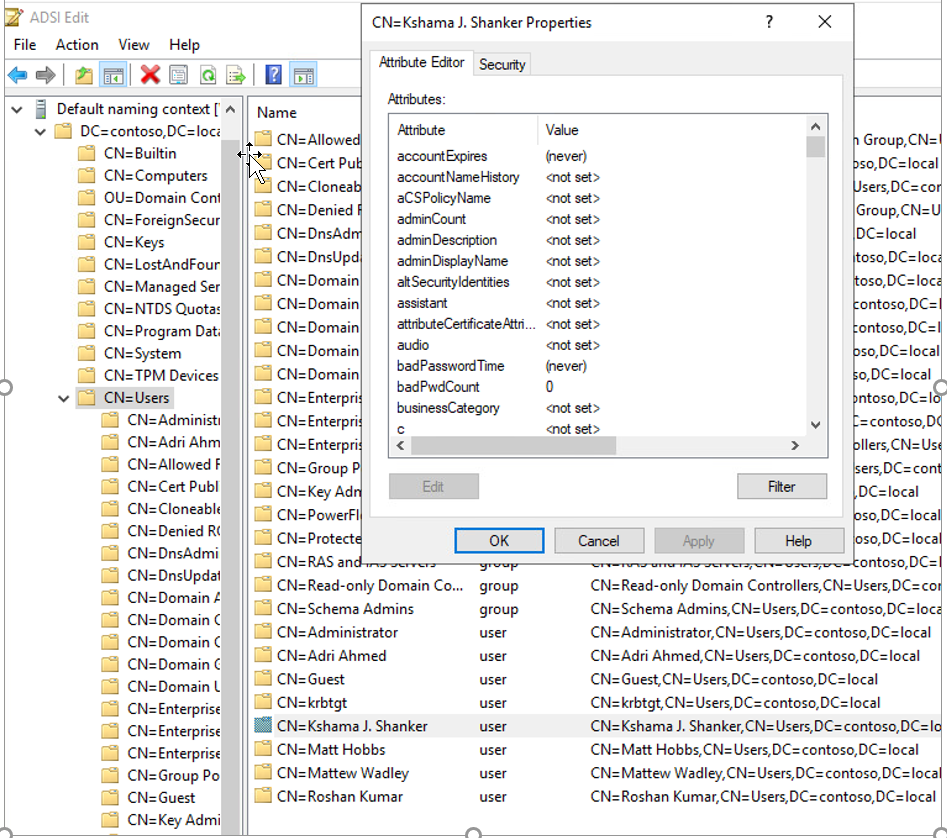
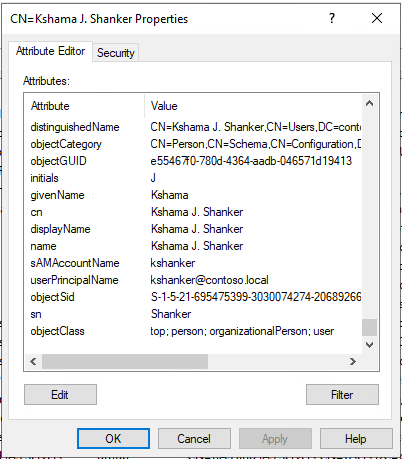
Step 1: Log in to one of the domain controllers and launch ADSI Edit utility
Step 2: locate the OU when the users and groups are located.
Step 3: Identify the attribute name for the Account Name, FirstName, Last Name, and other fields – Right Click on any of the users in the OU and select properties. This will list down all the AD attributes associated with the user object.
Additional troubleshooting notes by Matt Hobbs
While myself and Kshama were working on this, I found it very helpful to validate the LDAP server using a standard CentOS 7.x VM, as the tools and error messages help to give you more clarity in figuring out what might be going wrong.
- First things first, you want to save the certificate that the LDAP server is using on port 636:
[root@node2 ~]# openssl s_client -connect <your LDAP server IP>:636 -showcerts </dev/null 2>/dev/null | openssl x509 -outform PEM > ad_ldap_server.pem
[root@node2 ~]# ls
[root@node2 ~]# cat ad_ldap_server.pem
-----BEGIN CERTIFICATE-----
MIIGKzCCBROgAwIBAgITGwAAAAJu+0VYXtkhoQAAAAAAAjANBgkqhkiG9w0BAQsF
ADBVMRUwEwYKCZImiZPyLGQBGRYFbG9jYWwxFzAVBgoJkiaJk/IsZAEZFgdjb250
b3NvMSMwIQYDVQQDExpjb250b3NvLVdJTi1LUjBQRDFWUTVKNS1DQTAeFw0yMTEw
MTUwNDI1MzNaFw0yMjEwMTUwNDI1MzNaMCgxJjAkBgNVBAMTHVdJTi1LUjBQRDFW
UTVKNS5jb250b3NvLmxvY2FsMIIBIjANBgkqhkiG9w0BAQEFAAOCAQ8AMIIBCgKC
AQEAnc5vkxFa2QSmM7YWHX7/HGCokYoPLYuSPPObpyfxAF/mn8Nrsw0wl9cY6S6y
meYvuBF0bNbOkk+f3S1dSae7b5dT+Gfhek6yG7TtzkTX9/ZB5yP1q4ammI9vhlqF
DRW2uoJ5NimGoevZu7IGtfNfPHD7C5YcJ95PwNPidhDTJjyGD9bMM0tMTgn46Buc
wvKh7cU4ye9ldSuZ9EaGjcVdO9DY/Cv3XJlAjBvUb0z5VnVZAH9pgyQdA+fmoEIm
kptqagCQUjfPtEFqie2RSuifs+3MRA5pk2YaPsIxbe3RJ58u2cPnrUybGX/fxVvd
tovE6lALrmawNPT2Zq2EzSlXVQIDAQABo4IDHzCCAxswLwYJKwYBBAGCNxQCBCIe
IABEAG8AbQBhAGkAbgBDAG8AbgB0AHIAbwBsAGwAZQByMB0GA1UdJQQWMBQGCCsG
AQUFBwMCBggrBgEFBQcDATAOBgNVHQ8BAf8EBAMCBaAweAYJKoZIhvcNAQkPBGsw
aTAOBggqhkiG9w0DAgICAIAwDgYIKoZIhvcNAwQCAgCAMAsGCWCGSAFlAwQBKjAL
BglghkgBZQMEAS0wCwYJYIZIAWUDBAECMAsGCWCGSAFlAwQBBTAHBgUrDgMCBzAK
BggqhkiG9w0DBzAdBgNVHQ4EFgQU8KCEZSTrbbt1271CvklztOXT9aAwHwYDVR0j
BBgwFoAUAyemxrxN7mk0VsxnTaZO+K8xvJUwgeIGA1UdHwSB2jCB1zCB1KCB0aCB
zoaBy2xkYXA6Ly8vQ049Y29udG9zby1XSU4tS1IwUEQxVlE1SjUtQ0EsQ049V0lO
LUtSMFBEMVZRNUo1LENOPUNEUCxDTj1QdWJsaWMlMjBLZXklMjBTZXJ2aWNlcyxD
Tj1TZXJ2aWNlcyxDTj1Db25maWd1cmF0aW9uLERDPWNvbnRvc28sREM9bG9jYWw/
Y2VydGlmaWNhdGVSZXZvY2F0aW9uTGlzdD9iYXNlP29iamVjdENsYXNzPWNSTERp
c3RyaWJ1dGlvblBvaW50MIHOBggrBgEFBQcBAQSBwTCBvjCBuwYIKwYBBQUHMAKG
ga5sZGFwOi8vL0NOPWNvbnRvc28tV0lOLUtSMFBEMVZRNUo1LUNBLENOPUFJQSxD
Tj1QdWJsaWMlMjBLZXklMjBTZXJ2aWNlcyxDTj1TZXJ2aWNlcyxDTj1Db25maWd1
cmF0aW9uLERDPWNvbnRvc28sREM9bG9jYWw/Y0FDZXJ0aWZpY2F0ZT9iYXNlP29i
amVjdENsYXNzPWNlcnRpZmljYXRpb25BdXRob3JpdHkwSQYDVR0RBEIwQKAfBgkr
BgEEAYI3GQGgEgQQF7XyhUZTrkChGG3yXG3kfoIdV0lOLUtSMFBEMVZRNUo1LmNv
bnRvc28ubG9jYWwwDQYJKoZIhvcNAQELBQADggEBAFy+iB2e7fBiz535Lg5NvJuy
NQ8UAwFStags/+SW7+UqLmBoucQ/V9GjKqk0nGxYXDehvBN3N03sRUJqXly2H8Cj
d8IgWj6N2jqDKGsUJcjfjEPMn5WpebWf6euPJPF7qm0MNKmoIkKxwJG4brAyKJdV
CusIUwSw+q5kpb2cgB22XZkWz40G6syfRdMt/hSJkygVijJ0vcF3x5WwuIrs+OIC
tXt/ewAQFzPZRw4c215SaOSdRW8Lt1M2YblH9akfkSl1ljKg3iQrDO19S9MPuivS
FmG8MX7dTdCDA9ZUK0jZVVwM9AGjyMKWwwYeSqTNkCkYGXEbQljiapWY9qT7EK0=
-----END CERTIFICATE-----
2. Next you should do the same for the standard SSL certificate of the same host on port 443:
[root@node2 ~]# openssl s_client -connect <your LDAP server IP>:443 -showcerts </dev/null 2>/dev/null | openssl x509 -outform PEM > root.pem
[root@node2 ~]# cat root.pem
-----BEGIN CERTIFICATE-----
MIIDhTCCAm2gAwIBAgIQHBUUW+D/zYtAEQNnncm80jANBgkqhkiG9w0BAQsFADBV
MRUwEwYKCZImiZPyLGQBGRYFbG9jYWwxFzAVBgoJkiaJk/IsZAEZFgdjb250b3Nv
MSMwIQYDVQQDExpjb250b3NvLVdJTi1LUjBQRDFWUTVKNS1DQTAeFw0yMTEwMTUw
NDIyMTdaFw0yNjEwMTUwNDMyMTdaMFUxFTATBgoJkiaJk/IsZAEZFgVsb2NhbDEX
MBUGCgmSJomT8ixkARkWB2NvbnRvc28xIzAhBgNVBAMTGmNvbnRvc28tV0lOLUtS
MFBEMVZRNUo1LUNBMIIBIjANBgkqhkiG9w0BAQEFAAOCAQ8AMIIBCgKCAQEAuBWc
UbjGQVFo92g1dhl0PPsnrUM5HuW19iuJZiUKXQgCTyzcVzq8KFDrIlZA3p3p2Opu
slO+laNbIIx8soI4BHV+YTW+kuueaPsM3bfGnkacuckuhdXQ7mK9201ImOYCtEVh
zIBJefEid4TIBlnCRGEeVZOUn7vyUSF4WKf7KuuJFuoyiLbJHiP6/Xeni4ktwVrt
6AMkzOCHpQcIWsNREQw2w7fCvhUUL/fdhLjR2EU/KJVXxialdyCotWpuSTXkoIhw
XVtmBy3TP4krw5HmF0oh73eB2TzAptJr02wvbaX5EeX4lANtPkJq0BEZ7QUci8lm
JVz0HqDT1AGA6LUQoQIDAQABo1EwTzALBgNVHQ8EBAMCAYYwDwYDVR0TAQH/BAUw
AwEB/zAdBgNVHQ4EFgQUAyemxrxN7mk0VsxnTaZO+K8xvJUwEAYJKwYBBAGCNxUB
BAMCAQAwDQYJKoZIhvcNAQELBQADggEBAJNzexrjlMYXsefudqIgFnukS31nCNnA
5asAZ1MhrRM9tvpeHz/rQ4Sk1y0WGI0UqVXVxO2FmYl01gwL4CC8xa5JHiqPWV4h
miibKEmDIpcURgmeoZRuye1c4+BrB7gmoYOtcc7Cp2Mcixk+2LhuYImLjGeo2Wm9
VFAET4BNyW2n/+BwdOZrk1nXXzI+m+PXF0j0Bfhzxs2Am4WbXQEH6bVYHQ8bGnnD
xmV9mbWZD4PWVi0Cay5Ith9qBAqYMTt0APPg8ziXRSbPRc7YJ7Z7RuGeJmuEO+Wn
xLGQv96J2UbdPKYrNVRATnzrhvDUS0KorEo4ULyCcajqciliPyO5VfA=
-----END CERTIFICATE-----
3. Install the openldap tools: (in particular though, openldap-clients)
[root@node2 ~]# yum install openldap*
4. Test the connection to your LDAP server, but expect the following error:
[root@node2 ~]# ldapsearch -ZZ -h <your LDAP server IP> -D administrator@contoso.local -W -b CN=Users,DC=contoso,DC=local sn
ldap_start_tls: Connect error (-11)
        additional info: error:14090086:SSL routines:ssl3_get_server_certificate:certificate verify failed (unable to get local issuer certificate)
5. Import the certificates you created in the first steps into your ca-trust:
[root@node2 ~]# cp ad_ldap_server.pem /etc/pki/ca-trust/source/anchors/
[root@node2 ~]# cp root.pem /etc/pki/ca-trust/source/anchors/
[root@node2 ~]# update-ca-trust
6. At this stage, things will now work but you might get tripped by this first:
[root@node2 anchors]# ldapsearch -ZZ -h <your LDAP server IP> -D administrator@contoso.local -W -b CN=Users,DC=contoso,DC=local sn
ldap_start_tls: Connect error (-11)
        additional info: TLS: hostname does not match CN in peer certificate
7. So retry it with the FQDN instead to match the certificate, and it will then finally work:
[root@node2 anchors]# ldapsearch -ZZ -h <FQDN Address> -D administrator@contoso.local -W -b CN=Users,DC=contoso,DC=local sn
Enter LDAP Password:
# extended LDIF
#
# LDAPv3
# base <CN=Users,DC=contoso,DC=local> with scope subtree
# filter: (objectclass=*)
# requesting: sn
#

# Users, contoso.local
dn: CN=Users,DC=contoso,DC=local
8. If you’re still having trouble, there is a way to force it to ignore certificates – but this won’t be useful for you later on as PowerFlex Manager will insist upon it:
LDAPTLS_REQCERT=never ldapsearch -ZZ -h <your LDAP server IP> -D administrator@contoso.local -W -b CN=Users,DC=contoso,DC=local sn9. I hope this post comes in handy for you, and we look forward to hearing any comments / questions / observations that you may have!
Useful URLs for troubleshooting LDAPS:
https://community.cloudera.com/t5/Support-Questions/How-to-test-LDAPS-url-from-Linux/td-p/226572
https://techcommunity.microsoft.com/t5/sql-server/step-by-step-guide-to-setup-ldaps-on-windows-server/ba-p/385362
https://community.arubanetworks.com/browse/articles/blogviewer?blogkey=5d5ebd94-1e19-4d82-b1a4-fcfe0e2a7794
https://stackoverflow.com/questions/7885785/using-openssl-to-get-the-certificate-from-a-server
https://bl.ocks.org/magnetikonline/0ccdabfec58eb1929c997d22e7341e45