Earlier this month (June 2021) PowerFlex 3.6 was announced to the world, it includes a number of great enhancements, one particularly feature that has been added is support for Oracle Linux KVM. Whilst to many this may appear as support for ‘yet another hypervisor’, however to anyone wishing to run their Oracle databases in a virtual environment and take advantage of the huge scale out performance capabilities of PowerFlex software defined storage, this is huge.
Running Oracle databases on virtual machines has always been a contentious issue, with Oracle enforcing very strict rules around what must be licensed in order to ensure compliance.
Details of these requirements can be found in this document: https://www.oracle.com/assets/partitioning-070609.pdf . In basic terms, Oracle recognises two methods to ‘partition’ a server, soft or hard. If soft partitioning is implemented then every potential compute resource i.e. CPU core that could potentially be used must be licensed, if hard partitioning is used then only those compute resources within the hard partition need to be licensed.
Oracle regards hypervisors such as VMware vSphere or Microsoft Hyper-V as soft partition capable only, whereas Oracle Linux KVM can comply with hard partitioning requirements provided it is configured according to this document https://www.oracle.com/a/ocom/docs/linux/ol-kvm-hard-partitioning.pdf
Deploying Oracle databases on virtual machines in a hypervisor environment that supports hard partitions could significantly reduce Oracle license costs in a virtualised environment.
The purpose of this blog is to show three things:
- How to deploy Oracle Linux KVM and Oracle Linux Virtualization Manager
- How to configure the Oracle Linux KVM virtual machines as hard partitions.
- How to attach PowerFlex volumes to Oracle Linux KVM hosts.
The environment that was used for this exercise is three PowerFlex R640 Compute Only nodes, connected to an existing PowerFlex cluster consisting of four Storage Only nodes. This all interconnects over a pair of 25GbE network switches.
There are two parts to the Oracle Linux KVM solution, the actual KVM nodes that will host the virtual machines, plus a management system, Oracle Linux Virtualization Manager. This management system can be installed on a dedicated host or virtual machine, alternatively it can be installed within the Oracle Linux KVM cluster itself in what is known as a Self-Hosted Engine. The lab environment being used here has its own dedicated management cluster running on VMware, hence for this deployment a dedicated Oracle Enterprise Linux 7.9 virtual machine was created to act as a dedicated management server. My plan is at some time in the future, to create a fully hyper-converged environment with its own Self-Hosted Engine.
A Minimal Installation of Oracle Enterprise Linux is sufficient for the management host and the network should be configured so that it can connect to the management network of the Oracle Linux KVM hosts (deployed in a future step), it also requires internet access. It is advisable to configure NTP and perform a full update with yum.
Once the operating system is configured, the required Oracle Linux Virtualization Manager packages can be installed
# yum-config-manager --enable ol7_latest
# yum install oracle-ovirt-release-el7 -y
# yum clean all
# yum repolist
# yum-config-manager --disable ovirt-4.2
# yum-config-manager --disable ovirt-4.2-extra
# yum install ovirt-engine -y
It will take a few minutes for the ‘engine’ to deploy, once complete it can be configured with the engine-setup command. There are a number of questions, the default answer can be accepted for most questions but it is recommended to refer to https://docs.oracle.com/en/virtualization/oracle-linux-virtualization-manager/getstart/manager-install.html#manager-install-prepare if clarification is required for any of the answers
# engine-setup . . .--== SUMMARY ==--[ INFO ] Restarting httpd Please use the user 'admin@internal' and password specified in order to login Web access is enabled at: http://olvm200.test.local:80/ovirt-engine https://olvm200.test.local:443/ovirt-engine Internal CA 7F:BF:54:1E:73:34:C3:F0:95:29:D2:20:3A:C4:C4:78:60:AF:C8:40 SSH fingerprint: SHA256:rbbemhkEy0l0+sjrmhoO2gnPBAhyw5rgiXNfo5eReLU--== END OF SUMMARY ==--[ INFO ] Stage: Clean up Log file is located at /var/log/ovirt-engine/setup/ovirt-engine-setup-20210617184942-jtklch.log [ INFO ] Generating answer file '/var/lib/ovirt-engine/setup/answers/20210617185423-setup.conf' [ INFO ] Stage: Pre-termination [ INFO ] Stage: Termination [ INFO ] Execution of setup completed successfully
At the end of the engine-setup process, the summary provides browser links that should be used to access the management interface. In order for this to work properly, the IP details of the management server must be included in DNS for the environment.
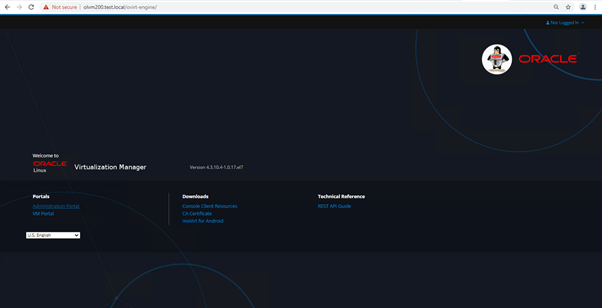
In a web browser, enter the URL for the management server.
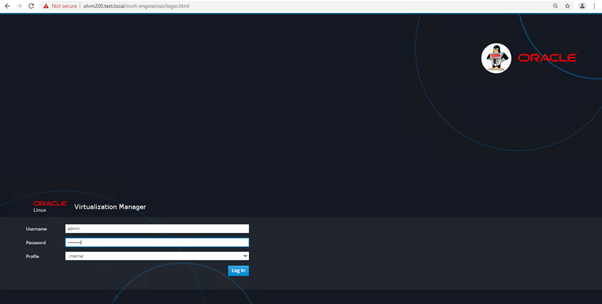
Click on the Administration Portal link, enter admin as the user and the password that was provided during the engine-setup process
The main dashboard screen is then presented
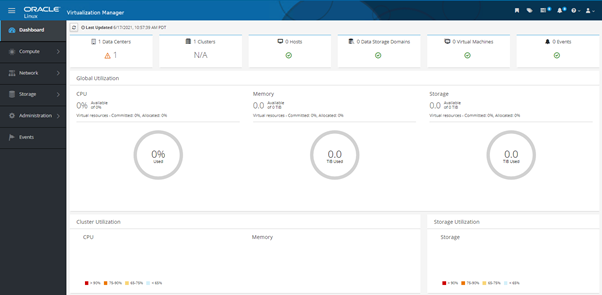
This screen means there is a management server available and ready for use, the nodes that will be used as KVM hosts should now be prepared. As with the management server, these are installed with Oracle Enterprise Linux 7.9, in this environment the installation was performed using the Virtual Media capability of the iDRAC, if a large number of hosts or Oracle Linux virtual machines are required, a network deployment server should be created to accelerate deployment times. The required networks must be configured on each host, for this installation the networks were configured to follow the PowerFlex Logical V3 networking best practice. This consists of two LACP bonds, one made from port 1 of each NIC and the other from port 2, these bonds then have the required VLANs mapped to them – all management networks on bond0 and all data networks on bond1. Other network configuration options can also be configured.
# ip -br a
.
.
.
 p2p1             UP
 p2p2             UP
 p3p1             UP
 p3p2             UP
 idrac            UNKNOWN
 bond1            UP             fe80::526b:4bff:feb2:244b/64
 bond1.168@bond1  UP             192.168.168.25/24 fe80::526b:4bff:feb2:244b/64
 bond1.176@bond1  UP             192.168.176.25/24 fe80::526b:4bff:feb2:244b/64
 bond1.152@bond1  UP             192.168.152.25/24 fe80::526b:4bff:feb2:244b/64
 bond1.160@bond1  UP             192.168.160.25/24 fe80::526b:4bff:feb2:244b/64
 bond0            UP             fe80::526b:4bff:feb2:244a/64
 bond0.105@bond0  UP             192.168.105.25/24 fe80::526b:4bff:feb2:244a/64
These hosts should have NTP configured, be updated using yum and entered into DNS.
The Oracle Linux KVM components can now be installed on each host
# yum-config-manager --enable ol7_latest
# yum install oracle-ovirt-release-el7
# yum clean all
# yum-config-manager --disable ovirt-4.2
# yum-config-manager --disable ovirt-4.2-extra
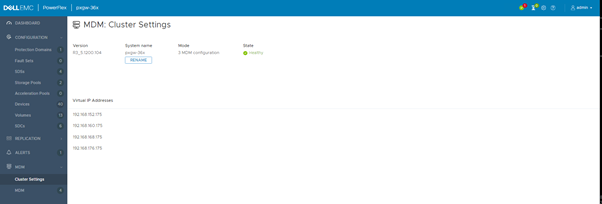
To enable access to the volumes presented by the PowerFlex storage cluster, the client (SDC) software must be installed on each host. In order to perform the SDC installation it should be directed to the virtual IP addresses for the storage cluster, these addresses can be provided by the PowerFlex GUI.
# MDM_IP=192.168.152.175,192.168.160.175,192.168.168.175,192.168.176.175 rpm -ivh PowerFlex_3.6_355_RHEL_OEL7/EMC-ScaleIO-sdc-3.6-0.355.el7.x86_64.rpm
 warning: PowerFlex_3.6_355_RHEL_OEL7/EMC-ScaleIO-sdc-3.6-0.355.el7.x86_64.rpm: Header V4 RSA/SHA1 Signature, key ID 1c853b80: NOKEY
 Preparing…                          ################################# [100%]
 Updating / installing…
    1:EMC-ScaleIO-sdc-3.6-0.355.el7    ################################# [100%]
 EMC-ScaleIO-diag_coll-0.17.linux.noarch.bsx: 21/06 10:56:57.989769: Installing diagnostic collector
 Created symlink from /etc/systemd/system/multi-user.target.wants/diag_coll.service to /etc/systemd/system/diag_coll.service.
 EMC-ScaleIO-diag_coll-0.17.linux.noarch.bsx: 21/06 10:56:58.163549: Diagnostic collector version 0.17 installed
 /var/tmp/rpm-tmp.7eitKM: line 286: which:: command not found
 Using pre-compiled selinux policy /bin/emc/scaleio/selinux/precompiled_scini.pp
 Installing selinux policy
 Generating new UUID 39482A26-8C91-4C9E-B036-F0D298D4F03E
 Updating file /etc/emc/scaleio/drv_cfg.txt with GUID
 Updating file /etc/emc/scaleio/drv_cfg.txt with MDM (192.168.152.175,192.168.160.175,192.168.168.175,192.168.176.175)
 Starting scini (via systemctl):  [  OK  ]
After installation, each SDC is now visible in the PowerFlex GUI meaning they can have volumes presented to them.
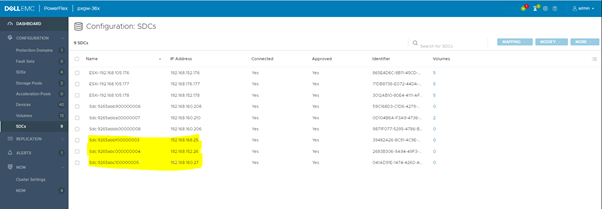
For ease of identification, rename the SDCs within the PowerFlex GUI.
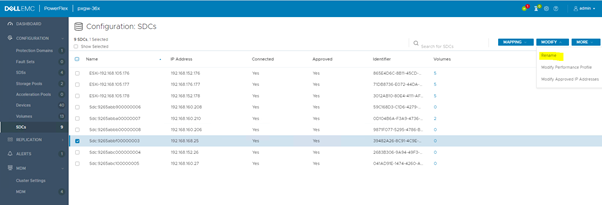
Select each SDC -> Modify -> Rename
There is one last piece of ‘storage housekeeping’ that should be performed on each host. During the process to add the host into the Oracle Linux KVM cluster, the multipath daemon (multipathd) will be installed on each host, if there are local disks attached to each host that will not contribute to any shared storage, they should be masked from multipathd, at the same time the PowerFlex volumes should be configured so that they are always visible.
# mkdir -p /etc/multipath/conf.d
# vi /etc/multipath/conf.d/powerflex.conf
 blacklist {
 devnode "" } blacklist_exceptions { devnode "scini"
 }

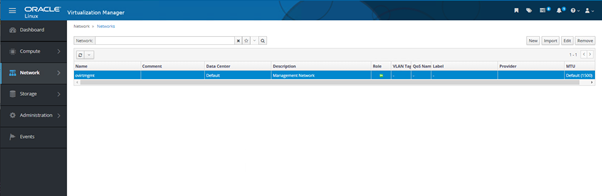
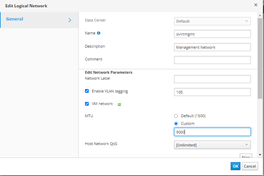
The final step before adding the hosts is the network configuration, the deployment of Oracle Linux Virtualization Manager creates a single management network called ovirtmgmt. As mentioned above, all the host networks are configured as VLANs on bonded interfaces. The screen capture below shows that the ovirtmgmt network has no VLAN tagging by default.
To modify the network, highlight it and select Edit. Select Enable VLAN tagging and fill in the VLAN ID. Also in this environment the switches are configured to enable an MTU of 9000, this can be configured here as well.
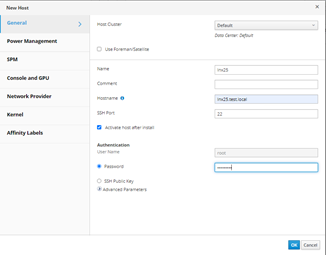
Now the hosts can be added to the cluster, in the left hand navigation bar, select Compute, then Hosts, no hosts have been added at this point, hence this is blank.

Select New and complete the fields in the box that pops up. The Power Management section can be completed now or added later. Click OK.
The host displays its status as installing and then after a time as Up.


If Power Management was not configured during the installation process, it can be done by highlighting the host and clicking Edit. Select Power Management on left
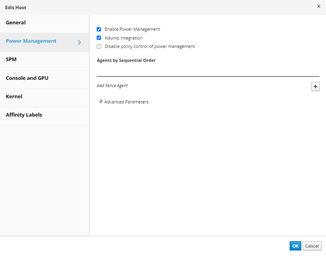
Select Enable Power Management, the Kdump Integration button is selected by default, then click on Advanced Parameters below Add Fence Agent.
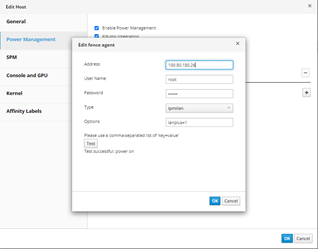
For a PowerEdge server with an iDRAC9, fill in the following:
Address: IP address of the iDRAC
User Name: iDRAC Username
Password: iDRAC Password
Type: ipmilan
Options: lanplus=1
Press the Test button to ensure everything is working.
Add the remaining hosts to the cluster using the same process as for the first host.
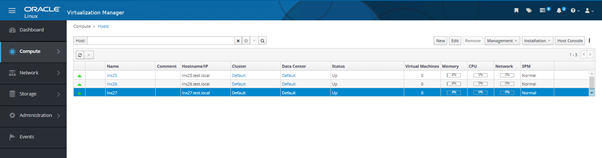
The cluster now consists of three nodes and everything is showing as green, it is now possible to map PowerFlex volumes to this cluster and use them as storage for provisioning virtual machines. A volume can be created through a CLI, a REST API call or through the PowerFlex GUI.
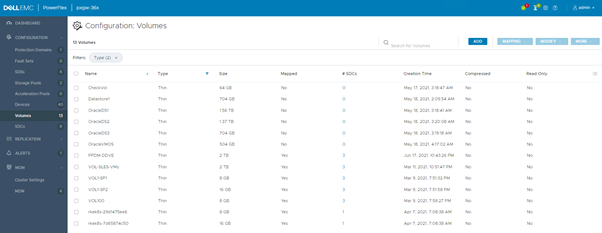
Select Volumes from the left pane and then ADD in the top right hand corner

Select the number of volumes, the name of the volumes, thick or thin provisioning, the size and which storage pool the volume should be created from.
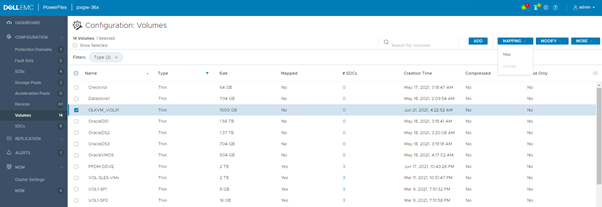
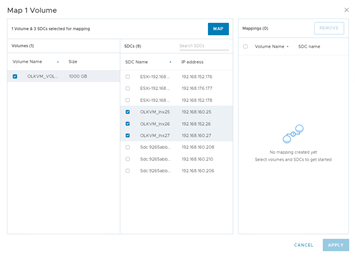
The volume can now be mapped to the three Oracle Linux KVM hosts
In theory it should now be a case of just adding a new Storage Domain in Oracle Linux Virtualization manager that uses this newly mapped volume, however before doing that, it is good to see how the hosts see the volume. Using the lsblk command all attached block devices are listed, as the listing below shows, the servers deployed here have a number of local disks sda – sdk (sda is the boot device), as well as the scinia device presented from the PowerFlex storage.
# lsblk
 NAME                                MAJ:MIN RM   SIZE RO TYPE  MOUNTPOINT
 sdf                                   8:80   0   1.7T  0 disk
 sdd                                   8:48   0   1.7T  0 disk
 sdb                                   8:16   0   1.8T  0 disk
 sdk                                   8:160  0   1.7T  0 disk
 sdi                                   8:128  0   1.7T  0 disk
 sr0                                  11:0    1  1024M  0 rom
 sdg                                   8:96   0   1.7T  0 disk
 sde                                   8:64   0   1.7T  0 disk
 sdc                                   8:32   0   1.8T  0 disk
 sda                                   8:0    0 111.7G  0 disk
 ├─sda2                                8:2    0     1G  0 part  /boot
 ├─sda3                                8:3    0   104G  0 part
 │ ├─ol-swap                         252:1    0     4G  0 lvm   [SWAP]
 │ └─ol-root                         252:0    0   100G  0 lvm   /
 └─sda1                                8:1    0   200M  0 part  /boot/efi
 sdj                                   8:144  0   1.7T  0 disk
 sdh                                   8:112  0   1.7T  0 disk
 scinia                              251:0    0  1000G  0 disk
 └─3307d42e11aa950f-9fd7be6000000005 252:2    0  1000G  0 mpath
It was mentioned above that prior to the hosts being added to the Oracle Linux KVM cluster, a multipathd rule was added to ensure that only the PowerFlex devices are recognised by multipathd, the outcome of this can be seen below
# multipath -ll
 3307d42e11aa950f-9fd7be6000000005 dm-2 ,
 size=1000G features='1 queue_if_no_path' hwhandler='0' wp=rw
 -+- policy='service-time 0' prio=1 status=active - #:#:#:# scinia 251:0 active ready running
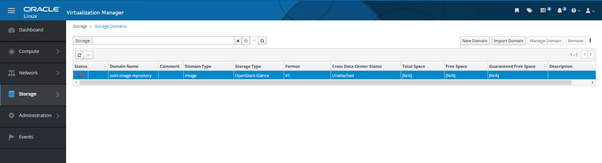
To add the storage to the Oracle Linux KVM environment, navigate to the Oracle Linux Virtualization Manager, select Storage in the left pane and then Storage Domains.
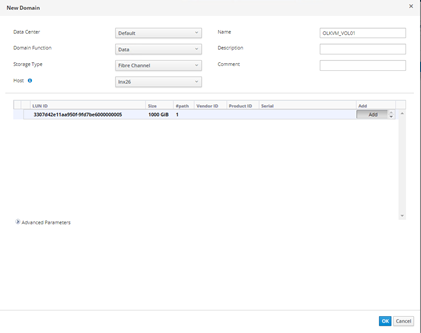
Select New Domain, provide a name for this new domain, leave Domain Function as Data, now this is where things might not be obvious, for the Storage Type, select Fibre Channel, if everything is working as expected, the LUN that was listed with the multipath -ll command is listed and can be added as a Storage Domain – click Add, then OK
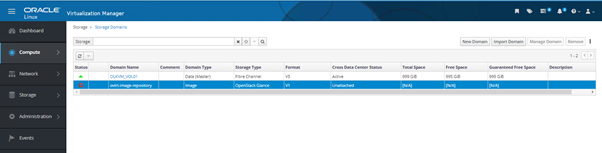
Initially the new Storage Domain will show as Locked (a padlock under Status), shortly afterwards showing as Ready (upward green arrow under Status)
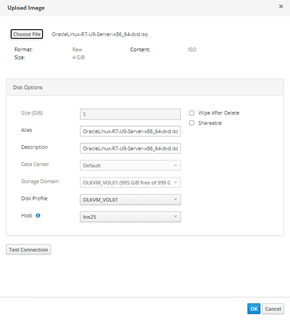
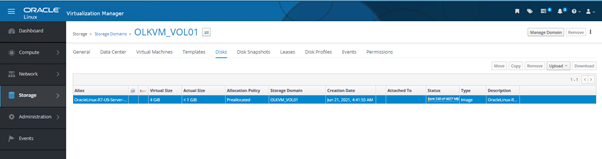
Now to do something useful with the environment, deploy a virtual machine and attach it to a couple of networks that are not the default management network (ovirtmgmt). There is no kickstart or deployment server within this environment, hence to enable installation, an ISO image needs to be uploaded. Within the Storage Domains screen, click on the name of the Storage Domain that the ISO is to be uploaded to, then click on the Disks tab.
Click on Upload, a new dialogue box will open. At the top of this box, select the local ISO file to be uploaded, this should automatically fill the remaining boxes in the window, click OK and wait for the upload to complete. The ISO image selected here is Oracle Enterprise Linux 7.9, the exact same ISO that was used to deploy the hosts, of course many other operating systems could be deployed including various flavours or versions of Linux along with Microsoft Windows Server or Desktop.
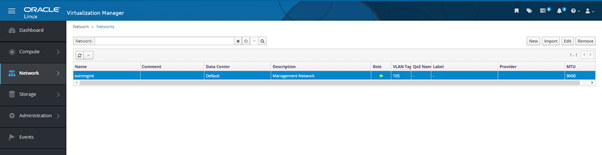
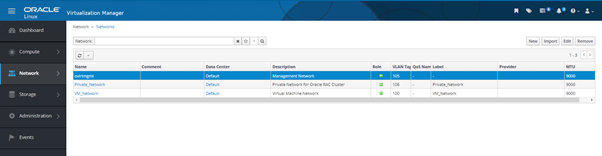
Adding the new networks is a two step process, firstly the networks must be defined and then they should be added to the Oracle Linux KVM hosts. In the Oracle Linux Virtualization Manager interface, select Network and then Networks, only the default ovirtmgmt network is listed.
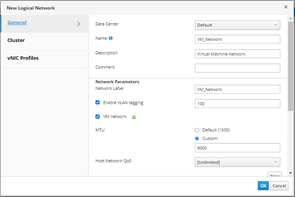
Select New and provide all the information about the new network in the dialogue box. For this deployment, two networks were added, a Virtual Machine network using VLAN 100 and a Private Network using VLAN 106. As with the ovirtmgmt network, an MTU size of 9000 was enabled as the switches were configured to support this.
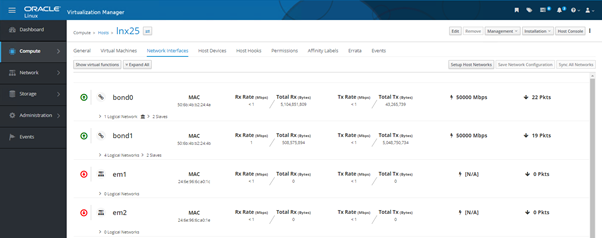
These new networks must be added to each of the Oracle Linux KVM hosts. Select Compute in the left pane, then Hosts, click on one of the hosts and select the Network Interfaces tab.
Click on Setup Host Networks. A dialogue box will pop up, it shows the existing network configuration on the left and the Unassigned networks on the right
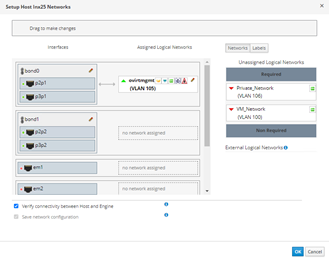
. To assign the networks to the host, it is simply a case of dragging the unassigned networks on to the physical network of choice, in this case bond0.

Repeat these steps for each Oracle Linux KVM host.
The environment is now ready to deploy the first virtual machines, these could be running Windows, Linux or pretty much any operating system that can be virtualised on an x86 platform. In this example an Oracle Enterprise Linux virtual machine is deployed with the addition of the required steps to make the virtual machine comply with Oracle’s hard partitioning requirements.
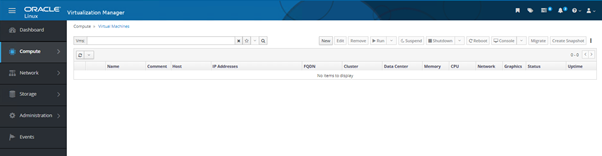
In the left pane, click on Compute, then Virtual Machines
Click on New to create a virtual machine
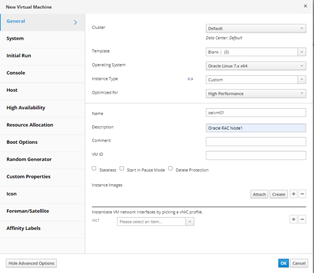
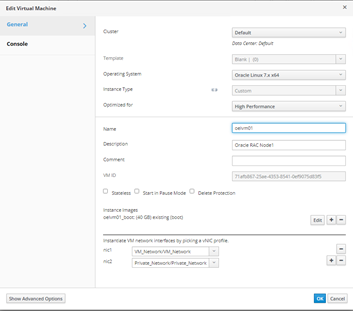
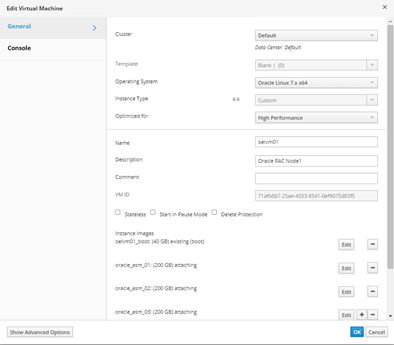
Under the General tab, fill in the details of the Operating System, provide a Name and optionally a Description. Select High Performance in the ‘Optimized for’ box. Under Instance Images, select Create
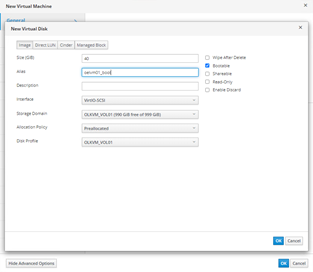
This is the image that provides the boot disk for the virtual machine, select a size and provide an alias, changing the default of <VM Name>_disk1 to <VM Name>_boot highlights that this is a boot disk. Click OK when done.
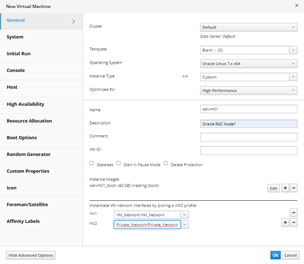
Next select the networks that should be connected to this virtual machine.
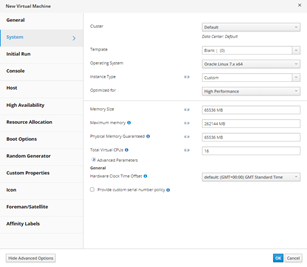
Select the System tab on the left hand side and fill in the RAM and virtual CPU requirements
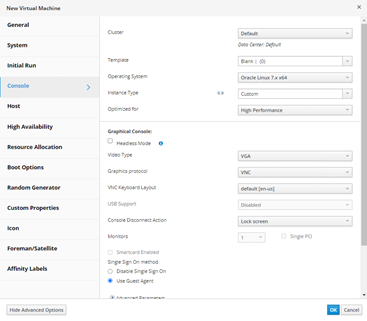
Select Console, by default when selecting High Performance, Headless Mode is selected, uncheck this box if the console is required for the operating system deployment.
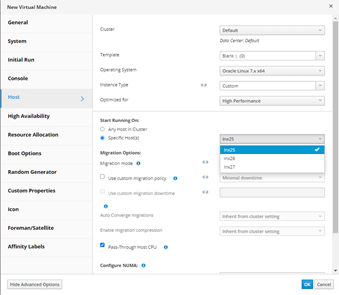
The virtual machine being created here is to be installed with Oracle Enterprise Linux and be used to host an Oracle database, in order to be compliant with Oracle’s hard partitioning rules, a number of settings are required. Within the Host options, ensure that a Specific Host is selected to run this virtual machine.
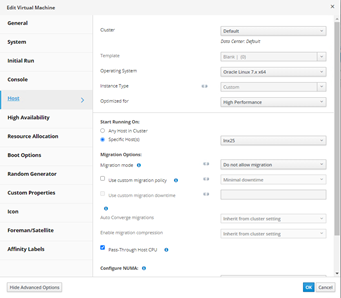
For the Migration Mode, Do not allow migration should be selected, this ensures that this virtual machine can never migrate away from its selected physical host. In addition to ensuring the virtual machine cannot move, it is also necessary to ‘pin’ the virtual CPUs to underlying physical cores, meaning that only those cores need to be licensed.
In order to verify that CPU pinning is in place, the olvm-vmcontrol utility needs to be installed, this was installed on the host running the Virtualization Manager but could be installed on any server running Oracle Enterprise Linux
# yum install -y olvm-vmcontrol
# export OLVMUTIL_PASS=
By logging into the physical Oracle Linux KVM hosts, the available CPU cores/threads can be listed using the lscpu command
# lscpu
Architecture:          x86_64
CPU op-mode(s):        32-bit, 64-bit
Byte Order:            Little Endian
CPU(s):                72
On-line CPU(s) list:   0-71
Thread(s) per core:    2
Core(s) per socket:    18
Socket(s):             2
NUMA node(s):          2
Vendor ID:             GenuineIntel
CPU family:            6
Model:                 85
Model name:            Intel(R) Xeon(R) Gold 6140 CPU @ 2.30GHz
Stepping:              4
CPU MHz:               1707.236
CPU max MHz:           3700.0000
CPU min MHz:           1000.0000
BogoMIPS:              4600.00
Virtualization:        VT-x
L1d cache:             32K
L1i cache:             32K
L2 cache:              1024K
L3 cache:              25344K
NUMA node0 CPU(s):     0,2,4,6,8,10,12,14,16,18,20,22,24,26,28,30,32,34,36,38,40,42,44,46,48,50,52,54,56,58,60,62,64,66,68,70
NUMA node1 CPU(s):     1,3,5,7,9,11,13,15,17,19,21,23,25,27,29,31,33,35,37,39,41,43,45,47,49,51,53,55,57,59,61,63,65,67,69,71
Using the olvm-vmcontrol utility, it is possible to pin the virtual CPUs to a range of cores/threads on the physical host
olvm-vmcontrol -m olvm200.test.local -u admin@internal -e -v oelvm01 -c setvcpu -s 0,2,4,6,8,10,12,14,16,18,20,22,24,26,28,30
 Oracle Linux Virtualization Manager VM Control Utility 4.3.1-1
 Connected to Oracle Linux Virtualization Manager 4.3.10.4-1.0.17.el7
 Setting vcpu pinning …
 Trying to pin virtual cpu # 0
 Trying to pin virtual cpu # 1
 Trying to pin virtual cpu # 2
 Trying to pin virtual cpu # 3
 Trying to pin virtual cpu # 4
 Trying to pin virtual cpu # 5
 Trying to pin virtual cpu # 6
 Trying to pin virtual cpu # 7
 Trying to pin virtual cpu # 8
 Trying to pin virtual cpu # 9
 Trying to pin virtual cpu # 10
 Trying to pin virtual cpu # 11
 Trying to pin virtual cpu # 12
 Trying to pin virtual cpu # 13
 Trying to pin virtual cpu # 14
 Trying to pin virtual cpu # 15
 Retrieving vcpu pinning to confirm it has been set…
 vcpu 0 pinned to cpuSet[0,2,4,6,8,10,12,14,16,18,20,22,24,26,28,30]
 vcpu 1 pinned to cpuSet[0,2,4,6,8,10,12,14,16,18,20,22,24,26,28,30]
 vcpu 2 pinned to cpuSet[0,2,4,6,8,10,12,14,16,18,20,22,24,26,28,30]
 vcpu 3 pinned to cpuSet[0,2,4,6,8,10,12,14,16,18,20,22,24,26,28,30]
 vcpu 4 pinned to cpuSet[0,2,4,6,8,10,12,14,16,18,20,22,24,26,28,30]
 vcpu 5 pinned to cpuSet[0,2,4,6,8,10,12,14,16,18,20,22,24,26,28,30]
 vcpu 6 pinned to cpuSet[0,2,4,6,8,10,12,14,16,18,20,22,24,26,28,30]
 vcpu 7 pinned to cpuSet[0,2,4,6,8,10,12,14,16,18,20,22,24,26,28,30]
 vcpu 8 pinned to cpuSet[0,2,4,6,8,10,12,14,16,18,20,22,24,26,28,30]
 vcpu 9 pinned to cpuSet[0,2,4,6,8,10,12,14,16,18,20,22,24,26,28,30]
 vcpu 10 pinned to cpuSet[0,2,4,6,8,10,12,14,16,18,20,22,24,26,28,30]
 vcpu 11 pinned to cpuSet[0,2,4,6,8,10,12,14,16,18,20,22,24,26,28,30]
 vcpu 12 pinned to cpuSet[0,2,4,6,8,10,12,14,16,18,20,22,24,26,28,30]
 vcpu 13 pinned to cpuSet[0,2,4,6,8,10,12,14,16,18,20,22,24,26,28,30]
 vcpu 14 pinned to cpuSet[0,2,4,6,8,10,12,14,16,18,20,22,24,26,28,30]
 vcpu 15 pinned to cpuSet[0,2,4,6,8,10,12,14,16,18,20,22,24,26,28,30]
 NOTE: if the VM is running you must now stop and then start the VM from the Oracle Linux Virtualization Manager in order for CPU pinning changes to take effect.
 NOTE: a restart or a reboot of the VM is not sufficient to put CPU pinning changes into effect.
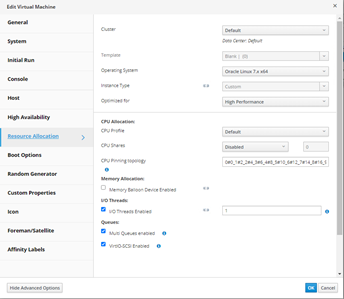
As can be seen from the output, this pins each virtual CPU to a range of physical cores/threads, if more control is desired i.e. pinning a specific virtual CPU to a specific core/thread, this can be done from the Virtualization Manager GUI, under the Virtual Machine Resource Allocation settings, the CPU Pinning Topology option can be used.
Now when running the olvm-vmcontrol utility with the getvcpu option, it is possible to see this direct mapping
# olvm-vmcontrol -m olvm200.test.local -u admin@internal -e -v oelvm01 -c getvcpu
Oracle Linux Virtualization Manager VM Control Utility 4.3.1-1
Connected to Oracle Linux Virtualization Manager 4.3.10.4-1.0.17.el7
Getting vcpu pinning …
vcpu 0 pinned to cpuSet[0]
vcpu 1 pinned to cpuSet[2]
vcpu 2 pinned to cpuSet[4]
vcpu 3 pinned to cpuSet[6]
vcpu 4 pinned to cpuSet[8]
vcpu 5 pinned to cpuSet[10]
vcpu 6 pinned to cpuSet[12]
vcpu 7 pinned to cpuSet[14]
vcpu 8 pinned to cpuSet[16]
vcpu 9 pinned to cpuSet[18]
vcpu 10 pinned to cpuSet[20]
vcpu 11 pinned to cpuSet[22]
vcpu 12 pinned to cpuSet[24]
vcpu 13 pinned to cpuSet[26]
vcpu 14 pinned to cpuSet[28]
vcpu 15 pinned to cpuSet[30]
For Oracle license audit purposes, the output of this command is stored by default (this can be changed) in the olvm-vmcontrol-audit.log file. The output below shows three virtual machines
# cat olvm-vmcontrol-audit.log
Oracle Linux Virtualization Manager CPU Pinning Audit Log File
Format version 1.0
timestamp  | operation | vm_id | vm_name | vm_cpu_pinning | vm_total_cpu_threads | vm_num_sockets | vm_cores_per_socket | vm_threads_per_core |  vm_migration_support | vm_last_start_time | vm_status | host_name | host_network_name |  host_kernel_version | host_total_cpu_threads | host_num_sockets | host_cores_per_socket | host_threads_per_core | hash
2021-06-21 17:40:46.471 | getvcpu | 71afb867-25ae-4353-8541-0ef9075d83f5 | oelvm01 | 0#0_1#2_2#4_3#6_4#8_5#10_6#12_7#14_8#16_9#18_10#20_11#22_12#24_13#26_14#28_15#30 | 16 | 16 | 1 | 1 | PINNED | 2021-06-21 17:30:53.789 | UP | lnx25 | lnx25.test.local | vmlinuz-5.4.17-2102.202.5.el7uek.x86_64 | 72 | 2 | 18 | 2 | b89a75356584b395040c311bbbfe10e5
2021-06-21 17:40:53.478 | getvcpu | f4d0ba0a-38c1-437d-877b-f7bcc21439d6 | oelvm02 | 0#0_1#2_2#4_3#6_4#8_5#10_6#12_7#14_8#16_9#18_10#20_11#22_12#24_13#26_14#28_15#30 | 16 | 16 | 1 | 1 | USER_MIGRATABLE | 2021-06-21 17:33:51.122 | UP | lnx26 | lnx26.test.local | vmlinuz-5.4.17-2102.202.5.el7uek.x86_64 | 72 | 2 | 18 | 2 | 8144b957604ed060877d774f20ce6c52
2021-06-21 17:41:03.145 | getvcpu | d9eee5a0-19d0-4879-9485-59247a3e6657 | oelvm03 | 0#0_1#2_2#4_3#6_4#8_5#10_6#12_7#14_8#16_9#18_10#20_11#22_12#24_13#26_14#28_15#30 | 16 | 16 | 1 | 1 | USER_MIGRATABLE | 2021-06-21 17:34:56.378 | UP | lnx27 | lnx27.test.local | vmlinuz-5.4.17-2102.202.5.el7uek.x86_64 | 72 | 2 | 18 | 2 | 602f2acd0945f38e9a2008d0960a0ef7
The virtual machine is now ready to be installed with Oracle Enterprise Linux
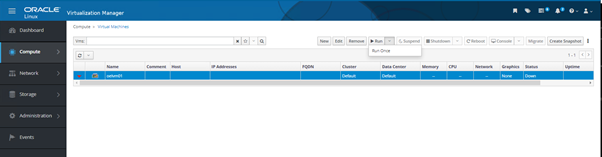
In the Virtualization Manager interface, browse to Compute -> Virtual Machines, highlight the virtual machine and then using the drop down arrow next to Run, select Run Once
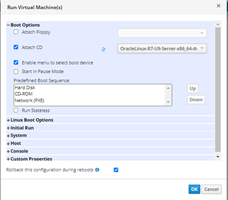
Attach the ISO image that was uploaded previously
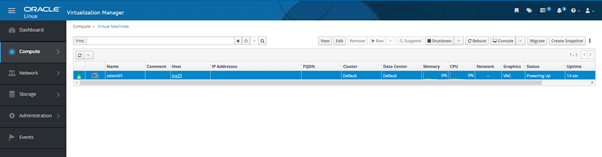
The virtual machine will start, indicated by the upward pointing green arrows next to it. Click on the Console button to attach to it (if not already installed, virt-viewer may need to be installed https://virt-manager.org/download)

The operating system can be installed/configured to the requirements of the database being used on it. Additional virtual machines can be deployed and if high availability is required, Oracle RAC can be configured with shared virtual disks.
To add shared virtual disks, select Storage -> Disks, click on New
Fill in the details of the new virtual disk, importantly if it is to be shared between virtual machines, ensure the Shareable button is selected.
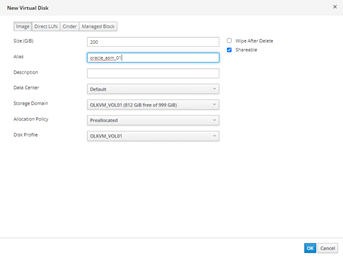
Repeat this for the number of virtual disks that are required. Here there are three.
To present these virtual disks to the virtual machines, navigate to Compute -> Virtual Machines, highlight a virtual machine and click Edit.
To the right of the Instance Images line, click on the plus (+) sign
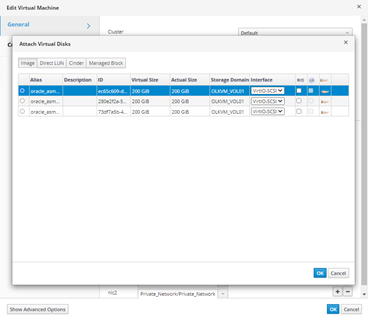
Select a virtual disk and click OK. Repeat this for each virtual disk until all are listed and click OK.
Repeat this for each virtual machine.
These disks can now be used as ASM volumes for an Oracle RAC cluster.

Kevin, this is brilliant. Thank you for helping to push to make Oracle Linux Virtualization a reality – as you mentioned this is enormous for many customer environments in helping them achieve the best possible licensing outcomes, while at the same time getting the best possible I/O subsystem for databases with PowerFlex!
I have a question about the way you pinned the vCPUs with olvm-vmcontrol. Is it possible that you’re utilizing twice as many cores as you thought you were? Take a look at the output of lscpu -e and map the vCPU you’re pinning to the core it lands on. I’m assuming you have hyperthreading turned on so there would be 2 threads per core (and as a result, 2 vCPU’s per core). If you put a vCPU on a single thread on core 0 and then put another vCPU on a single thread on core 1, you’re using two cores worth of processor, not one as you would think. At least this is how I understand it from Oracle’s perspective.
I created a spreadsheet so I could visualize exactly what’s going on so I would avoid both this and also overlapping vCPUs (resulting in awesome license utilization but crap performance lol). Ping me if you’re interested in chatting about this. I know it’s been a minute since this was posted but still might be worthwhile.
Hi Eric
Firstly, thanks for reading and secondly adding a comment!!
I will be honest and say that this was written some time ago and I have slept since then, which at my age means I have forgotten most of it. You could well be correct in your thoughts around this, I do remember at the time thinking that the documentation on olvm-vmcontrol was a little vague…
Since writing this, I have been playing a bit with CPU pinning for a number of ‘experiments’ in my lab but most of the time I do this manually with virsh edit to change the underlying XML file of the virtual machine. I agree that lscpu is very powerful, I have even used the -p switch to output to a CSV file, then used filters to check which CPU/Core/Thread I actually want to use.
virsh -r capabilities can also be used to display the CPU characteristics of the host itself, it displays the threads associated with each core as ‘siblings’:
etc…
I am not sure if you have seen this paper: https://www.researchgate.net/publication/283007598_Analyzing_the_Impact_of_CPU_Pinning_and_Partial_CPU_Loads_on_Performance_and_Energy_Efficiency
It provides some interesting insight into aligning virtual machines across cores/threads.
I am actually about to start on another science project where I will be utilising CPU pinning but on this occasion, also HBA pass-through, something I have not tried before. The aim is basically to see if a particular piece of software makes better use of CPU resources when running in a VM rather than on bare metal.
Anyway, thanks again.