Pretty much every conversation I am having these days about PowerFlex at some point ends up on the subject of containers – Docker, Kubernetes, CSI drivers, etc. etc…
Whilst I feel my understanding of the topic is good enough to have these high level conversations, it struck me that actually this is just talk, I have never actually had any true experience, at the coal face.
Hence the decision was made to install/configure Kubernetes in a lab environment and make it work with the PowerFlex CSI driver. In addition to this, it was decided that rather than use one of the tools available to automate the deployment, the manual step by step approach would be attempted, thereby gaining an understanding of all the clever things these tools do.
In the lab, there are a number of Dell servers: 6 x VxFlex R740xd Storage/HCI Nodes, along with 3 x VxFlex R640 Compute Nodes. The plan was to configure the 6 x R740xd servers to act as worker nodes but also to run the PowerFlex software components providing an HCI deployment on Linux, the 3 x R640 would be the master nodes but also provide the load balancing and virtual IP requirements for Kubernetes and to the PowerFlex Gateway. This excellent blog describes a similar deployment: https://www.linuxtechi.com/setup-highly-available-kubernetes-cluster-kubeadm which along with the documentation at https://kubernetes.io/docs/home was referred to a lot (plus of course numerous Google searches when all else failed).
The environment would hopefully end up something like this:
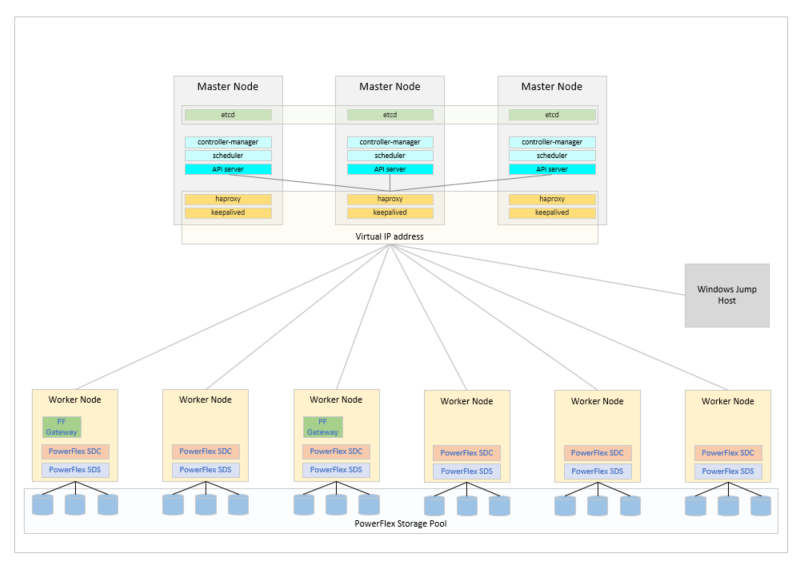
The first step was to install Linux on all the various master and worker nodes, pretty much any flavour of Linux that is supported by PowerFlex could have been used but CentOS 7.x was selected. Whilst newer options are available, CentOS 7 is like that comfortable pair of old slippers that you cannot throw away. Once Linux was deployed on all the nodes and the networks configured, the real work could begin.
To deploy the PowerFlex software components which provide the software defined storage platform, the method described in the official documentation was used:
https://docs.delltechnologies.com/bundle/VXF_DEPLOY/page/GUID-F0699245-93C5-41BD-9848-C43C896F1C31.html
Install the Gateway/Installation Manager software on the first node; create a CSV file to configure the deployment; browse to the IP address of the Gateway; upload the RPM packages and CSV file into the Gateway; kick off the installation.
One important thing to highlight here, the PowerFlex deployment installs a component called the Lightweight Installation Agent (LIA) which is used purely for the installation and for upgrades, this uses TCP port 9099 which is also used by the Kubernetes network management, for this reason the LIA was disabled on all nodes. Note: A method for using an alternative port for the LIA is being investigated.
The PowerFlex Gateway used for the installation also serves another purpose, this is the path used to communicate RESTful API based commands to the PowerFlex environment.
Now that there is a software defined storage environment configured, the deployment of the Kubernetes environment that will use it can begin
A critical component within the Kubernetes deployment is the load balancer, this ensures that any communications are distributed across the master nodes and in the event of a master node failure, are routed to an alternative master node. In the environment deployed here, the load balancer is also used for a secondary purpose. As stated previously, the PowerFlex Gateway is used for all RESTful API communications with the PowerFlex cluster, since the CSI that will be installed uses this API, it is essential that the Gateway remains highly available. To achieve this, a second Gateway was deployed on another node within the cluster, some port changes made within Gateway configuration files and the load balancer configured to ensure a Gateway is always accessible. Documentation on configuring Gateway HA can be found here https://docs.delltechnologies.com/bundle/VXF_GATE_HA_TN/page/GUID-63EDA1C8-296E-484C-8A36-674723D6055B.html
The load balancer was deployed using the standard Linux packages haproxy and keepalived
# yum install -y haproxy keepalived
The keepalived configuration file was modified to provide virtual IP addresses for the two end points, a VIP ending in .10 for the kubernetes API and one ending in .100 for the PowerFlex Gateway.
# vi /etc/keepalived/keepalived.conf

 ! /etc/keepalived/keepalived.conf
 ! Configuration File for keepalived
 global_defs {
     router_id K8S_Keepalived
 }
 vrrp_script check_apiserver {
   script "/usr/bin/curl -s -k https://localhost:6443/healthz -o /dev/null"
   interval 3
   weight -2
   fall 10
   rise 2
   user root
 }
 vrrp_script chk_haproxy {
   script "pidof haproxy"
   interval 2
   weight 3
 }
 vrrp_instance VI_1 {
     state MASTER # MASTER on pfxlnx11, BACKUP on pfxlnx12 and pfxlnx13
     interface bond0.990
     virtual_router_id 150
     priority 255 # 255 on pfxlnx11, 254 on pfxlnx12 253 on pfxlnx13
     virtual_ipaddress {
         10.xxx.xxx.10/24
     }
     track_script {
         check_apiserver
     }
 }
 vrrp_instance VI_2 {
     state BACKUP # MASTER on pfxlnx12, BACKUP on pfxlnx11 and pfxlnx13
     interface bond0.990 # interface to monitor
    virtual_router_id 250
     priority 154 # 255 on pfxlnx12, 254 on pfxlnx11 253 on pfxlnx13
     virtual_ipaddress {
         10.xxx.xxx.100/24 # virtual ip address and subnet
     }
     track_script {
     chk_haproxy
     }
 }
Next haproxy was configured to ensure the incoming ports are routed to the correct destinations, the following should be added after the defaults section
.
.
#---------------------------------------------------------------------
# apiserver frontend which proxys to the masters
#---------------------------------------------------------------------
 frontend apiserver
     bind *:8443
     mode tcp
     option tcplog
     default_backend apiserver
#---------------------------------------------------------------------
# round robin balancing for apiserver
#---------------------------------------------------------------------
backend apiserver
     option httpchk GET /healthz
     http-check expect status 200
     mode tcp
     option ssl-hello-chk
     balance     roundrobin
         server pfxlnx11 10.xxx.xxx.11:6443 check
         server pfxlnx12 10.xxx.xxx.12:6443 check
         server pfxlnx13 10.xxx.xxx.13:6443 check
#
#--------------------------------------------------------------------
# Added for PowerFlex Gateway
#--------------------------------------------------------------------
frontend pflex
     bind *:80
     bind *:443 crt-ignore-err all ssl crt /etc/haproxy/certs/haproxy.pem
     option tcplog
     mode tcp
     default_backend     pflexgw
#
backend pflexgw
     mode tcp
     balance first
     option ssl-hello-chk
     server pfxsto14 10.xxx.xxx.14:28443 maxconn 256 ssl verify none
     server pfxsto16 10.xxx.xxx.16:28443 maxconn 256 ssl verify none
These files were then copied to the other nodes acting as load balancers and /etc/keepalived/keepalived.conf edited on each node to set the state and priorities, as noted in bold in the file shown above.
If the firewall is enabled on the hosts, add rules to allow the traffic to pass and then on each node, enable and start keepalived and haproxy
 # firewall-cmd --add-rich-rule='rule protocol value="vrrp" accept' --permanent
 # firewall-cmd --permanent --add-port=8443/tcp
 # firewall-cmd --reload
 # systemctl enable keepalived --now
 # systemctl enable haproxy --now
The functionality of the load balancer should be checked through a process of stopping processes etc. to ensure that access remains in various failure scenarios.
On all nodes (master and worker) it is necessary to disable swap and selinux.
# swapoff -a
# sed -i '/ swap / s/^\(.*\)$/#\1/g' /etc/fstab
# setenforce 0
# sed -i 's/^SELINUX=enforcing$/SELINUX=permissive/' /etc/selinux/config
Then open the firewall ports required by Kubernetes.
On the Master Nodes:
# firewall-cmd --permanent --add-port=6443/tcp
# firewall-cmd --permanent --add-port=2379-2380/tcp
# firewall-cmd --permanent --add-port=10250/tcp
# firewall-cmd --permanent --add-port=10251/tcp
# firewall-cmd --permanent --add-port=10252/tcp
# firewall-cmd --permanent --add-port=179/tcp
# firewall-cmd --permanent --add-port=4789/udp
# firewall-cmd --reload
On the Worker Nodes:
# firewall-cmd --permanent --add-port=10250/tcp
# firewall-cmd --permanent --add-port=30000-32767/tcp
# firewall-cmd --permanent --add-port=179/tcp
# firewall-cmd --permanent --add-port=4789/udp
# firewall-cmd --reload
On all nodes, load the br_netfilter module and ensure it is loaded on reboot, then add the sysctl parameters
# modprobe br_netfilter
# sh -c "echo '1' > /proc/sys/net/bridge/bridge-nf-call-iptables"
# sh -c "echo '1' > /proc/sys/net/ipv4/ip_forward"
# sh -c "echo '1' > /proc/sys/net/bridge/bridge-nf-call-ip6tables"

# cat <<EOF | sudo tee /etc/modules-load.d/k8s.conf
overlay
br_netfilter
EOF

# cat <<EOF | sudo tee /etc/sysctl.d/k8s.conf
net.bridge.bridge-nf-call-iptables = 1
net.ipv4.ip_forward = 1
net.bridge.bridge-nf-call-ip6tables = 1
EOF

# sysctl --system
At this point if the majority of guides or other blogs available on the internet had been followed, Docker would have been installed as the container run time environment, however a discovery was made whilst performing this exercise – Kubernetes will be deprecating Docker as a container runtime environment in the future, leaving a choice of containerd or CRI-O. For this deployment, containerd was selected. Even though Docker was not installed, the docker-ce repository was needed for the containerd.io package.
# yum-config-manager --add-repo https://download.docker.com/linux/centos/docker-ce.repo
# yum install -y containerd.io
# containerd config default | sudo tee /etc/containerd/config.toml
# systemctl restart containerd
# systemctl enable containerd --now
Finally the Kubernetes components could be installed, in order to do this a Kubernetes yum repository was required, the following was used to create the repository
# cat <<EOF | sudo tee /etc/yum.repos.d/kubernetes.repo
[kubernetes]
name=Kubernetes
baseurl=https://packages.cloud.google.com/yum/repos/kubernetes-el7-\$basearch
enabled=1
gpgcheck=1
repo_gpgcheck=1
gpgkey=https://packages.cloud.google.com/yum/doc/yum-key.gpg https://packages.cloud.google.com/yum/doc/rpm-package-key.gpg
exclude=kubelet kubeadm kubectl
EOF
yum can be used to install the latest versions of the Kubernetes packages, however the CSI 1.4 driver, only supports Kubernetes at version 1.20 or lower, at the time of writing, the latest version was 1.21
Using the –showduplicates option of yum, it is possible to list all available versions and then use yum to install the required version.
After installation, enable and start the kubelet service.
# yum --showduplicates list available kubectl --disableexcludes=kubernetes
# yum install -y kubelet-1.20.6-0 kubeadm-1.20.6-0 kubectl-1.20.6-0 --disableexcludes=kubernetes
# systemctl enable kubelet --now
Without Docker, there are no docker-cli commands, instead the crictl command is used for managing the container runtime, use the following to configure the endpoint for the crictl command
# crictl config runtime-endpoint unix:///var/run/containerd/containerd.sock
The process to form a Kubernetes cluster could now be started, on the first master node, the command below was run to initialise the cluster, the –control-plane-endpoint should be the virtual IP and port configured on the load balancer nodes.
# kubeadm init --control-plane-endpoint "pfxvip10.hci.spoc:8443" --upload-certs --pod-network-cidr=10.244.0.0/16
There was a lot of output and after a successful run, it ends as follows:
Your Kubernetes control-plane has initialized successfully!

To start using your cluster, you need to run the following as a regular user:

  mkdir -p $HOME/.kube
  sudo cp -i /etc/kubernetes/admin.conf $HOME/.kube/config
  sudo chown $(id -u):$(id -g) $HOME/.kube/config

Alternatively, if you are the root user, you can run:

  export KUBECONFIG=/etc/kubernetes/admin.conf

You should now deploy a pod network to the cluster.
Run "kubectl apply -f [podnetwork].yaml" with one of the options listed at:
  https://kubernetes.io/docs/concepts/cluster-administration/addons/

You can now join any number of the control-plane node running the following command on each as root:

  kubeadm join pfxvip10.hci.spoc:8443 --token l6vuft.ayybdk38qu0wlpmb \
    --discovery-token-ca-cert-hash sha256:b30800d088d37a42a39c2e9a68252e6f9c70fee89c471a0b4b48345097c5b13e \
    --control-plane --certificate-key c604bf4ea028c6828bb0f914252d1511a04ab074989f36c01d461e32e6215ab6

Please note that the certificate-key gives access to cluster sensitive data, keep it secret!
As a safeguard, uploaded-certs will be deleted in two hours; If necessary, you can use
"kubeadm init phase upload-certs --upload-certs" to reload certs afterward.

Then you can join any number of worker nodes by running the following on each as root:

kubeadm join pfxvip10.hci.spoc:8443 --token l6vuft.ayybdk38qu0wlpmb \
     --discovery-token-ca-cert-hash sha256:b30800d088d37a42a39c2e9a68252e6f9c70fee89c471a0b4b48345097c5b13e
Pay attention to the lines in bold, these would be required later in the process (note – the kubeadm join commands will be different for each installation).
A networking plane is required for the Kubernetes environment, here Calico was deployed other options are available.
# kubectl apply -f https://docs.projectcalico.org/manifests/calico.yaml
The second and third master nodes were added by running the commands specified in the output of the cluster initialisation on each node
# kubeadm join pfxvip10.hci.spoc:8443 --token l6vuft.ayybdk38qu0wlpmb \
  --discovery-token-ca-cert-hash sha256:b30800d088d37a42a39c2e9a68252e6f9c70fee89c471a0b4b48345097c5b13e \
  --control-plane --certificate-key c604bf4ea028c6828bb0f914252d1511a04ab074989f36c01d461e32e6215ab6
Each worker node was added with the following command run on each node
# kubeadm join pfxvip10.hci.spoc:8443 --token l6vuft.ayybdk38qu0wlpmb \
  --discovery-token-ca-cert-hash sha256:b30800d088d37a42a39c2e9a68252e6f9c70fee89c471a0b4b48345097c5b13e
Ensure that all nodes are listed with a STATUS of Ready
# kubectl get nodes
 NAME                STATUS   ROLES                  AGE   VERSION
 pfxlnx11.hci.spoc   Ready    control-plane,master   30h   v1.20.6
 pfxlnx12.hci.spoc   Ready    control-plane,master   30h   v1.20.6
 pfxlnx13.hci.spoc   Ready    control-plane,master   29h   v1.20.6
 pfxsto14.hci.spoc   Ready    <none>                 26h   v1.20.6
 pfxsto15.hci.spoc   Ready    <none>                 26h   v1.20.6
 pfxsto16.hci.spoc   Ready    <none>                 26h   v1.20.6
 pfxsto17.hci.spoc   Ready    <none>                 26h   v1.20.6
 pfxsto18.hci.spoc   Ready    <none>                 26h   v1.20.6
 pfxsto19.hci.spoc   Ready    <none>                 26h   v1.20.6
Check that all pods are either running or completed
# kubectl get pods -A
 NAMESPACE     NAME                                        READY   STATUS    RESTARTS   AGE
 kube-system   calico-kube-controllers-6dfcd885bf-rz2n6    1/1     Running   0          30h
 kube-system   calico-node-2kd4l                           1/1     Running   0          30h
 kube-system   calico-node-6vzrs                           1/1     Running   0          30h
 kube-system   calico-node-9dmn9                           1/1     Running   0          30h
 kube-system   calico-node-gg9nm                           1/1     Running   0          26h
 kube-system   calico-node-l6mgp                           1/1     Running   0          26h
 kube-system   calico-node-rpnh8                           1/1     Running   0          26h
 kube-system   calico-node-wh4wv                           1/1     Running   0          26h
 kube-system   calico-node-wjjdx                           1/1     Running   0          26h
 kube-system   calico-node-x2wkq                           1/1     Running   0          26h
 kube-system   coredns-74ff55c5b-94kmx                     1/1     Running   0          30h
 kube-system   coredns-74ff55c5b-km76w                     1/1     Running   0          30h
 kube-system   etcd-pfxlnx11.hci.spoc                      1/1     Running   0          30h
 kube-system   etcd-pfxlnx12.hci.spoc                      1/1     Running   0          30h
 kube-system   etcd-pfxlnx13.hci.spoc                      1/1     Running   0          30h
 kube-system   kube-apiserver-pfxlnx11.hci.spoc            1/1     Running   0          30h
 kube-system   kube-apiserver-pfxlnx12.hci.spoc            1/1     Running   0          30h
 kube-system   kube-apiserver-pfxlnx13.hci.spoc            1/1     Running   0          30h
 kube-system   kube-controller-manager-pfxlnx11.hci.spoc   1/1     Running   1          30h
 kube-system   kube-controller-manager-pfxlnx12.hci.spoc   1/1     Running   0          30h
 kube-system   kube-controller-manager-pfxlnx13.hci.spoc   1/1     Running   0          30h
 kube-system   kube-proxy-22vnc                            1/1     Running   0          30h
 kube-system   kube-proxy-26lgg                            1/1     Running   0          30h
 kube-system   kube-proxy-4zc2d                            1/1     Running   0          26h
 kube-system   kube-proxy-cgnnf                            1/1     Running   0          26h
 kube-system   kube-proxy-cvf6t                            1/1     Running   0          26h
 kube-system   kube-proxy-d4cs5                            1/1     Running   0          26h
 kube-system   kube-proxy-l9hh7                            1/1     Running   0          26h
 kube-system   kube-proxy-th59l                            1/1     Running   0          30h
 kube-system   kube-proxy-wjjtf                            1/1     Running   0          26h
 kube-system   kube-scheduler-pfxlnx11.hci.spoc            1/1     Running   1          30h
 kube-system   kube-scheduler-pfxlnx12.hci.spoc            1/1     Running   0          30h
 kube-system   kube-scheduler-pfxlnx13.hci.spoc            1/1     Running   0          30h
This output shows that everything is running well meaning that the next stage of this exercise can begin – the installation of the Dell PowerFlex Container Storage Interface (CSI). Documentation for the CSI can be found here: https://dell.github.io/storage-plugin-docs/docs/installation/helm/powerflex
The documentation provides a lot of detail, hopefully the step by step approach used in this document enhances it.
Select one of the master nodes on which to perform the following steps.
Install git
# yum install -y git
Install Helm and check the version
# curl https://raw.githubusercontent.com/helm/helm/master/scripts/get-helm-3 | bash
# helm version
version.BuildInfo{Version:"v3.5.4", GitCommit:"1b5edb69df3d3a08df77c9902dc17af864ff05d1", GitTreeState:"clean", GoVersion:"go1.15.11"}
Check that every node has the PowerFlex SDC component installed, the automated deployment with the Gateway and CSV file used at the start of this process deployed this on the worker nodes but a manual installation was required on the master nodes.
# rpm -qa | grep EMC
# rpm -ivh EMC-ScaleIO-sdc-<version>.el7.x86_64.rpm
The documentation stipulates that the Volume Snapshot CRDs and Volume Snapshot Controller from the external-snapshotter project on Github https://github.com/kubernetes-csi/external-snapshotter must be installed, it also states that for Kubernetes 1.20, release 4.0 of these should be used.
To list available releases
# git ls-remote --heads  https://github.com/kubernetes-csi/external-snapshotter
95ecc0e8461531e6d0f4e3a2f16b20d352070289        refs/heads/k8s_1.13.1
78164c3324fb45f1a9158e66e52e48f8f8010dc3        refs/heads/master
ec8786361c2f792b589151124594c5a2a9a60056        refs/heads/release-0.4
4a3e2fea8f49945c6a4840c17b7e9644d3a199c4        refs/heads/release-1.0
ac33959738598e55a0a0a9d5a2d08d7445f27f36        refs/heads/release-1.1
d5da3c1e527cd356696300222ebd8bf728971ae4        refs/heads/release-1.2
69da5b8de5dcd0fd41266ae81c14be97556bdfe0        refs/heads/release-2.0
44818867ab0a932cd0d85056a5d50a86ece515a6        refs/heads/release-2.1
1772a5408048266924fa0dbc7a84c308ebd0071b        refs/heads/release-3.0
f63ca22445ac290003c5659dd181682c6704c73d        refs/heads/release-3.1
bf03ef3dffa9857a997335149b6be4425b7e0e8a        refs/heads/release-4.0
78164c3324fb45f1a9158e66e52e48f8f8010dc3        refs/heads/release-4.1
9e44799e522f9fcba2c6d5b0ce799597902b84fc        refs/heads/revert-440-release-3.0_cherrypick_941821bf99ec8d30e7183d67decce4b5dd9bfee6
To clone the required release
# cd $HOME
# git clone --single-branch --branch release-4.0 https://github.com/kubernetes-csi/external-snapshotter
 Cloning into 'external-snapshotter'...
 remote: Enumerating objects: 42493, done.
 remote: Counting objects: 100% (24/24), done.
 remote: Compressing objects: 100% (22/22), done.
 remote: Total 42493 (delta 4), reused 10 (delta 2), pack-reused 42469
 Receiving objects: 100% (42493/42493), 58.30 MiB | 2.89 MiB/s, done.
 Resolving deltas: 100% (20450/20450), done.
In order to install the external-snapshotter, the commands provided on the Github page were followed https://github.com/kubernetes-csi/external-snapshotter/tree/release-4.0 these are repeated below.
Install the CRDs
# cd $HOME/external-snapshotter
# kubectl create -f client/config/crd
 customresourcedefinition.apiextensions.k8s.io/volumesnapshotclasses.snapshot.storage.k8s.io created
 customresourcedefinition.apiextensions.k8s.io/volumesnapshotcontents.snapshot.storage.k8s.io created
 customresourcedefinition.apiextensions.k8s.io/volumesnapshots.snapshot.storage.k8s.io created
Install Common Snapshot Controller
It is suggested that the namespace used should be changed from ‘default’ to ‘kube-system’, edit the two yaml files shown below, changing each instance of ‘default’ to ‘kube-system’ and then deploy the snapshot-controller
# vi deploy/kubernetes/snapshot-controller/setup-snapshot-controller.yaml
# vi deploy/kubernetes/snapshot-controller/rbac-snapshot-controller.yaml

# kubectl create -f deploy/kubernetes/snapshot-controller
 serviceaccount/snapshot-controller created
 clusterrole.rbac.authorization.k8s.io/snapshot-controller-runner created
 clusterrolebinding.rbac.authorization.k8s.io/snapshot-controller-role created
 role.rbac.authorization.k8s.io/snapshot-controller-leaderelection created
 rolebinding.rbac.authorization.k8s.io/snapshot-controller-leaderelection created
 statefulset.apps/snapshot-controller created
The prerequisite tasks were now complete, the process of installing the CSI could begin
Clone the PowerFlex CSI repository from Github
# cd $HOME
# git clone https://github.com/dell/csi-powerflex.git
 Cloning into 'csi-powerflex'...
 remote: Enumerating objects: 762, done.
 remote: Counting objects: 100% (470/470), done.
 remote: Compressing objects: 100% (285/285), done.
 remote: Total 762 (delta 217), reused 357 (delta 156), pack-reused 292
 Receiving objects: 100% (762/762), 1.49 MiB | 0 bytes/s, done.
 Resolving deltas: 100% (315/315), done.
Create a namespace called vxflexos
# kubectl create namespace vxflexos
 namespace/vxflexos created
Run the get_vxflexos_info.sh script to gather information about the PowerFlex environment
# sh ./csi-powerflex/helm/get_vxflexos_info.sh
 System ID         MDM IPs
 5961xxxxxxxxda0f  10.xxx.xxx.10 10.xxx.xxx.10
Edit the config.json file to match the PowerFlex environment. The endpoint should be the virtual IP address configured on the load balancer nodes to access the PowerFlex Gateway
# cd $HOME/csi-powerflex/
# vi config.json

 [
     {
         "username": "admin",
         "password": "xxxxxxxx",
         "systemID": "5961xxxxxxxxda0f",
         "endpoint": "http://10.xxx.xxx.100",
         "insecure": true,
         "isDefault": true,
         "mdm": "10.xxx.xxx.10,10.xxx.xxx.10"
     }
 ]
Create a secret for the environment
# kubectl create secret generic vxflexos-config -n vxflexos --from-file=config=$HOME/csi-powerflex/config.json
 secret/vxflexos-config created
Copy the sample values.yaml file to myvalues.yaml and edit it to match the requirements for the environment. Most of the default settings should be fine for information refer to:
https://dell.github.io/storage-plugin-docs/docs/features/powerflex
# cd ~/csi-powerflex/helm
# cp csi-vxflexos/values.yaml myvalues.yaml
# vi myvalues.yaml
.
.
.
To prevent having to enter the root password on each node during the CSI deployment process, enable passwordless login
# ssh-keygen
# ssh-copy-id root@pfxsto14
# ssh-copy-id root@pfxsto15
# ssh-copy-id root@pfxsto16
# ssh-copy-id root@pfxsto17
# ssh-copy-id root@pfxsto18
# ssh-copy-id root@pfxsto19
# ssh-copy-id root@pfxlnx12
# ssh-copy-id root@pfxlnx13
Run the CSI installer script
# cd ~/csi-powerflex/dell-csi-helm-installer
# ./csi-install.sh --namespace vxflexos --values ../helm/myvalues.yaml
 ------------------------------------------------------
 > Installing CSI Driver: csi-vxflexos on 1.20
 ------------------------------------------------------
 ------------------------------------------------------
 > Checking to see if CSI Driver is already installed
 ------------------------------------------------------
 ------------------------------------------------------
 > Verifying Kubernetes and driver configuration
 ------------------------------------------------------
 |- Kubernetes Version: 1.20
 |
 |- Driver: csi-vxflexos
 |
 |- Verifying Kubernetes versions
   |
   |--> Verifying minimum Kubernetes version                         Success
   |
   |--> Verifying maximum Kubernetes version                         Success
 |
 |- Verifying that required namespaces have been created             Success
 |
 |- Verifying that required secrets have been created                Success
 |
 |- Get SDC config and make MDM string for multi array support       |
 |- SDC MDM value created : 10.xxx.xxx.10,10.xxx.xxx.10              |
 |- IP ADDR 10.xxx.xxx.10 format is ok                               |
 |- IP ADDR 10.xxx.xxx.10 format is ok                               |
 |- Verifying the SDC installation                                   Success
 |
 |- Verifying alpha snapshot resources
   |
   |--> Verifying that alpha snapshot CRDs are not installed         Success
 |
 |- Verifying snapshot support
   |
   |--> Verifying that snapshot CRDs are available                   Success
   |
   |--> Verifying that the snapshot controller is available          Success
 |
 |- Verifying helm version                                           Success

 ------------------------------------------------------
 > Verification Complete - Success
 ------------------------------------------------------
 |
 |- Installing Driver                                                Success
   |
   |--> Waiting for Deployment vxflexos-controller to be ready       Success
   |
   |--> Waiting for DaemonSet vxflexos-node to be ready              Success
 ------------------------------------------------------
 > Operation complete
 ------------------------------------------------------
Ensure that all VxFlexOS pods are running
# kubectl get pods -A
 NAMESPACE     NAME                                        READY   STATUS    RESTARTS   AGE
 kube-system   calico-kube-controllers-6dfcd885bf-rz2n6    1/1     Running   0          2d7h
 kube-system   calico-node-2kd4l                           1/1     Running   0          2d7h
 kube-system   calico-node-6vzrs                           1/1     Running   0          2d7h
 kube-system   calico-node-9dmn9                           1/1     Running   0          2d7h
 kube-system   calico-node-gg9nm                           1/1     Running   0          2d3h
 kube-system   calico-node-l6mgp                           1/1     Running   0          2d3h
 kube-system   calico-node-rpnh8                           1/1     Running   0          2d3h
 kube-system   calico-node-wh4wv                           1/1     Running   0          2d3h
 kube-system   calico-node-wjjdx                           1/1     Running   0          2d3h
 kube-system   calico-node-x2wkq                           1/1     Running   0          2d3h
 kube-system   coredns-74ff55c5b-94kmx                     1/1     Running   0          2d7h
 kube-system   coredns-74ff55c5b-km76w                     1/1     Running   0          2d7h
 kube-system   etcd-pfxlnx11.hci.spoc                      1/1     Running   0          2d7h
 kube-system   etcd-pfxlnx12.hci.spoc                      1/1     Running   0          2d7h
 kube-system   etcd-pfxlnx13.hci.spoc                      1/1     Running   0          2d7h
 kube-system   kube-apiserver-pfxlnx11.hci.spoc            1/1     Running   0          2d7h
 kube-system   kube-apiserver-pfxlnx12.hci.spoc            1/1     Running   0          2d7h
 kube-system   kube-apiserver-pfxlnx13.hci.spoc            1/1     Running   0          2d7h
 kube-system   kube-controller-manager-pfxlnx11.hci.spoc   1/1     Running   1          2d7h
 kube-system   kube-controller-manager-pfxlnx12.hci.spoc   1/1     Running   0          2d7h
 kube-system   kube-controller-manager-pfxlnx13.hci.spoc   1/1     Running   0          2d7h
 kube-system   kube-proxy-22vnc                            1/1     Running   0          2d7h
 kube-system   kube-proxy-26lgg                            1/1     Running   0          2d7h
 kube-system   kube-proxy-4zc2d                            1/1     Running   0          2d3h
 kube-system   kube-proxy-cgnnf                            1/1     Running   0          2d3h
 kube-system   kube-proxy-cvf6t                            1/1     Running   0          2d3h
 kube-system   kube-proxy-d4cs5                            1/1     Running   0          2d3h
 kube-system   kube-proxy-l9hh7                            1/1     Running   0          2d3h
 kube-system   kube-proxy-th59l                            1/1     Running   0          2d7h
 kube-system   kube-proxy-wjjtf                            1/1     Running   0          2d3h
 kube-system   kube-scheduler-pfxlnx11.hci.spoc            1/1     Running   1          2d7h
 kube-system   kube-scheduler-pfxlnx12.hci.spoc            1/1     Running   0          2d7h
 kube-system   kube-scheduler-pfxlnx13.hci.spoc            1/1     Running   0          2d7h
 kube-system   snapshot-controller-0                       1/1     Running   0          21m
 vxflexos      vxflexos-controller-6cc64699cf-88nrx        5/5     Running   0          10m
 vxflexos      vxflexos-controller-6cc64699cf-9fmp8        5/5     Running   0          10m
 vxflexos      vxflexos-node-4hlzq                         2/2     Running   0          10m
 vxflexos      vxflexos-node-7dhx9                         2/2     Running   0          10m
 vxflexos      vxflexos-node-hdq8p                         2/2     Running   0          10m
 vxflexos      vxflexos-node-hhvrg                         2/2     Running   0          10m
 vxflexos      vxflexos-node-m2b95                         2/2     Running   0          10m
 vxflexos      vxflexos-node-pgf8b                         2/2     Running   0          10m
The CSI installation provides two templates that can be used to create storage classes for testing purposes, edit the fields highlighted to match the PowerFlex environment
# vi ~/csi-powerflex/helm/samples/storageclass/storageclass.yaml

 apiVersion: storage.k8s.io/v1
 kind: StorageClass
 metadata:
   name: vxflexos
   annotations:
     storageclass.kubernetes.io/is-default-class: "true"
 provisioner: csi-vxflexos.dellemc.com
 reclaimPolicy: Delete
 allowVolumeExpansion: true
 parameters:
   storagepool: PD01_MG01        #Insert Storage pool.
   systemID: 5961xxxxxxxxda0f    #Insert System ID
 volumeBindingMode: WaitForFirstConsumer
 allowedTopologies:
 - matchLabelExpressions:
   - key: csi-vxflexos.dellemc.com/5961xxxxxxxxda0f   #Insert System ID
     values:
     - csi-vxflexos.dellemc.com

 # vi ~/csi-powerflex/helm/samples/storageclass/storageclass-xfs.yaml

 apiVersion: storage.k8s.io/v1
 kind: StorageClass
 metadata:
   name: vxflexos-xfs
 provisioner: csi-vxflexos.dellemc.com
 reclaimPolicy: Delete
 allowVolumeExpansion: true
 parameters:
   storagepool: PD01_MG01        #Insert Storage pool.
   FsType: xfs
   systemID: 5961xxxxxxxxda0f    #Insert System ID
 volumeBindingMode: WaitForFirstConsumer
 allowedTopologies:
 - matchLabelExpressions:
   - key: csi-vxflexos.dellemc.com/5961xxxxxxxxda0f  #Insert System ID.
     values:
     - csi-vxflexos.dellemc.com
Create these two storage classes and verify they are listed
# kubectl create -f ~/csi-powerflex/helm/samples/storageclass/storageclass.yaml
 storageclass.storage.k8s.io/vxflexos created

# kubectl create -f ~/csi-powerflex/helm/samples/storageclass/storageclass-xfs.yaml
 storageclass.storage.k8s.io/vxflexos-xfs created

# kubectl get sc
 NAME                 PROVISIONER                RECLAIMPOLICY   VOLUMEBINDINGMODE      ALLOWVOLUMEEXPANSION   AGE
 vxflexos (default)   csi-vxflexos.dellemc.com   Delete          WaitForFirstConsumer   true                   34s
 vxflexos-xfs         csi-vxflexos.dellemc.com   Delete          WaitForFirstConsumer   true                   28s
When deployed using Helm, the CSI driver also provides a number of test scripts which can be used to ensure it is functioning correctly. The tests run in the example below, create two volumes, creates then deletes snapshots of the volumes and finally deletes the two volumes. To monitor what is happening, view the volume section of the PowerFlex GUI.
# kubectl create namespace helmtest-vxflexos
# cd ~/csi-powerflex/test/helm
# ./starttest.sh 2vols

# kubectl get pvc -A
 NAMESPACE           NAME    STATUS   VOLUME           CAPACITY   ACCESS MODES   STORAGECLASS   AGE
 helmtest-vxflexos   pvol0   Bound    k8s-6c03548bbd   8Gi        RWO            vxflexos       61s
 helmtest-vxflexos   pvol1   Bound    k8s-809446811d   16Gi       RWO            vxflexos-xfs   61s

# ./snaptest.sh

# ./stoptest.sh 2vols
 release "2vols" uninstalled
At this stage there was a fully working and tested Kubernetes environment which could provision persistent volumes from the PowerFlex storage system.
Thank you for reading!!

1 Response
[…] I created the blog detailing the step by step process of deploying Kubernetes with PowerFlex (https://powerflex.me/2021/05/13/kubernetes-with-the-powerflex-csi-a-step-by-step-guide) little did I know that a few weeks later, my colleagues in our Singapore Customer Solutions Centre […]