When I created the blog detailing the step by step process of deploying Kubernetes with PowerFlex (https://powerflex.me/2021/05/13/kubernetes-with-the-powerflex-csi-a-step-by-step-guide) little did I know that a few weeks later, my colleagues in our Singapore Customer Solutions Centre would request me to deploy a Red Hat Openshift environment for a customer engagement.
For this engagement, I was lucky enough to have more server infrastructure to work with (thank you Eric Mah!!), also unlike my Kubernetes environment, the PowerFlex storage was deployed on dedicated storage nodes separate from the compute nodes. This is pretty much a necessity with Openshift as it is not possible to run the PowerFlex SDS component in Red Hat Enterprise Core OS.
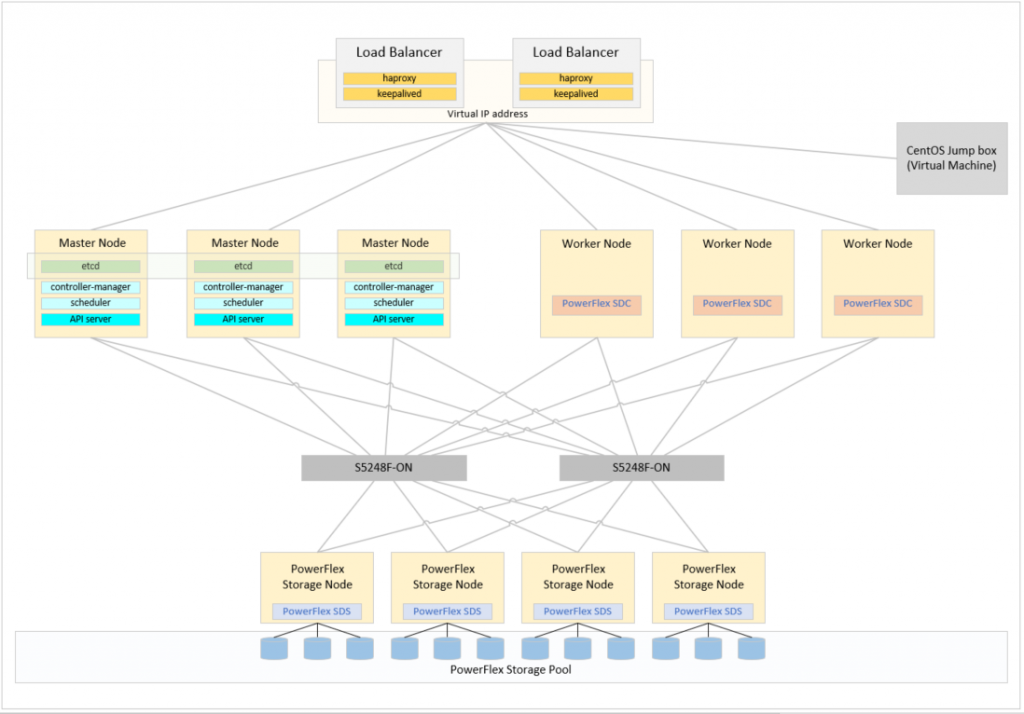
The final environment is shown in the diagram below, in order to achieve this final state it is necessary to first configure a bootstrap node to perform the deployment, for this purpose one of the worker nodes is configured as a bootstrap node and then converted to a worker – this seems to be a fairly standard process used in numerous deployments.
The Red Hat Openshift documentation provides details around many of the networking requirements.
(https://docs.openshift.com/container-platform/4.6/installing/installing_bare_metal/installing-bare-metal.html)
The first of these requirements is a load balancer configuration that can balance the API traffic on ports 6443 and 22623, as well as the Application Ingress traffic on ports 80 and 443. To provide this capability, once again I used the trusted combination of haproxy and keepalived. I had two dedicated RHEL 8 servers for this, of course these could have been virtual machines but as the hardware was available, it was used.
Another requirement to enable a smooth Openshift deployment is a solid DNS configuration. This is documented in the link provided above and should be read carefully, effectively the Openshift environment should be in a ‘child domain’ of the DNS domain it is installed within, for example in this environment, the domain is powerflex.local but the Openshift environment is in ocp1.powerflex.local
The two load balancer nodes also act as DNS servers using dnsmasq
After performing a minimal installation of RHEL 8 on both Load Balancer/DNS nodes the following steps were performed.
Register each system with Red Hat to enable downloads and updates
# subscription-manager register
 Registering to: subscription.rhsm.redhat.com:443/subscription
 Username: <username>
 Password: <password>
 The system has been registered with ID: xxxxxxxx-xxxx-xxxx-xxxx-xxxxxxxxxxxx
 The registered system name is: lnx156.powerflex.local
# subscription-manager attach --pool=<Pool ID>
Install any utilities that may be useful for troubleshooting and also the software packages that will be used later in the configuration process, then reboot.
# dnf install -y net-tools bind-utils numactl bash-completion tree dnsmasq haproxy keepalived chrony tar
# dnf update -y
# reboot
After the reboot, configure dnsmasq to provide DNS services on each server. The notes in the Openshift documentation clearly call out the requirement for the master and worker nodes, along with the entries for api, api-int and *.apps, there are a number of other blogs that suggest including the entries for etcd.
# vi /etc/dnsmasq.conf .
 #
 # Added for Openshift environment
 #
 domain=ocp1.powerflex.local
 server=172.24.57.15
 #
 address=/bootstrap.ocp1.powerflex.local/172.24.58.20
 ptr-record=20.58.24.172.in-addr.arpa,bootstrap.ocp1.powerflex.local
 address=/master0.ocp1.powerflex.local/172.24.58.21
 ptr-record=21.58.24.172.in-addr.arpa,master0.ocp1.powerflex.local
 address=/master1.ocp1.powerflex.local/172.24.58.22
 ptr-record=22.58.24.172.in-addr.arpa,master1.ocp1.powerflex.local
 address=/master2.ocp1.powerflex.local/172.24.58.23
 ptr-record=23.58.24.172.in-addr.arpa,master2.ocp1.powerflex.local
 #
 address=/worker0.ocp1.powerflex.local/172.24.58.24
 ptr-record=24.58.24.172.in-addr.arpa,worker0.ocp1.powerflex.local
 address=/worker1.ocp1.powerflex.local/172.24.58.25
 ptr-record=25.58.24.172.in-addr.arpa,worker1.ocp1.powerflex.local
 address=/worker2.ocp1.powerflex.local/172.24.58.26
 ptr-record=26.58.24.172.in-addr.arpa,worker2.ocp1.powerflex.local
 #
 address=/api.ocp1.powerflex.local/172.24.58.149
 address=/api-int.ocp1.powerflex.local/172.24.58.149
 address=/.apps.ocp1.powerflex.local/172.24.58.150
 #
 address=/etcd-0.ocp1.powerflex.local/172.24.58.21
 address=/etcd-1.ocp1.powerflex.local/172.24.58.22
 address=/etcd-2.ocp1.powerflex.local/172.24.58.23
 #
 srv-host=_etcd-server-ssl._tcp,/etcd-0.ocp1.powerflex.local,2380
 srv-host=_etcd-server-ssl._tcp,/etcd-1.ocp1.powerflex.local,2380
 srv-host=_etcd-server-ssl._tcp,/etcd-2.ocp1.powerflex.local,2380
Enable and start dnsmasq, then test each entry resolves correctly with the nslookup command
# systemctl enable dnsmasq --now
To ensure that the two nodes use themselves to resolve their own DNS queries, edit /etc/resolve.conf on each host to point to localhost/127.0.0.1, then change the attributes of the file so that it cannot be changed by any system processes e.g. NetworkManager. Enable the DNS service to pass through the firewall and reload the firewall configuration.
# vi /etc/resolv.conf

 # Modified for Openshift
 search ocp1.powerflex.local
 nameserver 127.0.0.1

# chattr +i /etc/resolv.conf

# firewall-cmd --permanent --add-service=dns
# firewall-cmd --reload
To ensure consistency across all system clocks within the environment, chrony is installed on the two Load Balancer/DNS nodes and configured to provide time services. Enable the NTP service to pass through the firewall and reload the firewall
# vi /etc/chrony.conf

 server 172.24.57.15 iburst
 .
 # Allow NTP client access from local network.
 #allow 192.168.0.0/16
 allow 172.24.58.0/24

# systemctl enable chronyd --now

# firewall-cmd --permanent --add-service=ntp
# firewall-cmd --reload
The two nodes can now be configured to provide the load balancing capabilities. This is done by editing /etc/haproxy/haproxy.cfg (recommend taking a backup first). There are two main areas to focus on in the file, the frontend/backend for the api and api-int (ports 6443 and 22623), plus the frontend/backend for the apps (port 80 and 443). There are comments in the example below that hopefully explain some of the additional entries.
The lines for the bootstrap node are only relevant whilst the cluster is being bootstrapped, once complete these lines can be removed or commented out. The inclusion of the master nodes in the apps backend sections, both http and https are not strictly required but do provide a solution to a potential problem. When the cluster is first bootstrapped, the three master nodes are also configured to be worker nodes (this is changed later in the process), if the load balancers are not configured to direct http and https traffic to them, certain operators in the cluster will not come up completely, one in particular being the graphical console.
The section near the bottom of the file is something I discovered in another blog which provides statistical information from the haproxy load balancers. Whilst the performance statistics provide limited value in this environment, the red/amber/green traffic light system for the various frontend and backend components proved particularly useful for troubleshooting.
# vi /etc/haproxy/haproxy.cfg

 #
 #---------------------------------------------------------------------
 # Global settings
 #---------------------------------------------------------------------
 global
     log         127.0.0.1 local2
     chroot      /var/lib/haproxy
     pidfile     /var/run/haproxy.pid
     maxconn     4000
     user        haproxy
     group       haproxy
     daemon

     stats socket /var/lib/haproxy/stats

 defaults
     mode                    http
     log                     global
     option                  httplog
     option                  dontlognull
     option http-server-close
     option forwardfor       except 127.0.0.0/8
     option                  redispatch
     retries                 3
     timeout http-request    30s
     timeout queue           1m
     timeout connect         30s
     timeout client          1m
     timeout server          1m
     timeout http-keep-alive 30s
     timeout check           30s
     maxconn                 4000
 #
 frontend ocp1-api
     bind *:6443
     option tcplog
     mode tcp
     default_backend api
 backend api
     option httpchk GET /healthz
     http-check expect status 200
     mode tcp
     balance roundrobin
     server bootstrap 172.24.58.20:6443 check check-ssl verify none # Comment out once bootstrap complete
     server master0 172.24.58.21:6443 check check-ssl verify none
     server master1 172.24.58.22:6443 check check-ssl verify none
     server master2 172.24.58.23:6443 check check-ssl verify none

 frontend ocp1-api-int
     bind *:22623
     option tcplog
     mode tcp
     default_backend api-int

 backend api-int
     mode tcp
     balance roundrobin
     server bootstrap 172.24.58.20:22623 check # Comment out once bootstrap complete
     server master0 172.24.58.21:22623 check
     server master1 172.24.58.22:22623 check
     server master2 172.24.58.23:22623 check

 frontend ocp1-apps-http
     bind *:80
     option tcplog
     mode tcp
     default_backend apps-http

 backend apps-http
     mode tcp
     balance roundrobin
     server master0 172.24.58.21:80 check  # Added as initially master nodes are master/worker nodes
     server master1 172.24.58.22:80 check  # Added as initially master nodes are master/worker nodes
     server master2 172.24.58.23:80 check  # Added as initially master nodes are master/worker nodes
     server worker0 172.24.58.24:80 check
     server worker1 172.24.58.25:80 check
     server worker2 172.24.58.26:80 check

 frontend apps-https
     bind *:443
     option tcplog
     mode tcp
     default_backend apps-https

 backend apps-https
     mode tcp
     balance roundrobin
     option ssl-hello-chk
     server master0 172.24.58.21:443 check  # Added as initially master nodes are master/worker nodes
     server master1 172.24.58.22:443 check  # Added as initially master nodes are master/worker nodes
     server master2 172.24.58.23:443 check  # Added as initially master nodes are master/worker nodes
     server worker0 172.24.58.24:443 check
     server worker1 172.24.58.25:443 check
     server worker2 172.24.58.26:443 check

 listen stats
     bind 0.0.0.0:9000
     mode http
     balance
     timeout client 5000
     timeout connect 4000
     timeout server 30000
     stats uri /stats
     stats refresh 5s
     stats realm HAProxy\ Statistics
     stats auth admin:H@pr0xy
     stats admin if TRUE
Configure the VRRP virtual IP addresses with keepalived. The keepalived configuration files are slightly different on each node to ensure that one node is a master and the other a standby for each of the two virtual IP addresses. The dnsmasq configuration performed earlier contains entries for these virtual IP addresses.
On node 1
# vi /etc/keepalived/keepalived.conf
 global_defs {
 router_id ocp1_vrrp
 }

 vrrp_script haproxy_check {
 script "pidof haproxy"
 interval 2
 weight 2
 }

 vrrp_instance OCP1_API_LB {
    state BACKUP
    interface bond0.1302
    virtual_router_id 150
    priority 98
    virtual_ipaddress {
      172.24.58.149/24
    }
    track_script {
      haproxy_check
    }
  }
 vrrp_instance OCP1_APPS_LB {
    state MASTER
    interface bond0.1302
    virtual_router_id 250
    priority 100
    virtual_ipaddress {
      172.24.58.150/24
    }
    track_script {
      haproxy_check
    }
 }
On node 2
# vi /etc/keepalived/keepalived.conf
 global_defs {
 router_id ocp1_vrrp
 }

 vrrp_script haproxy_check {
 script "pidof haproxy"
 interval 2
 weight 2
 }

 vrrp_instance OCP1_API_LB {
    state MASTER
    interface bond0.1302
    virtual_router_id 150
    priority 100
    virtual_ipaddress {
      172.24.58.149/24
    }
    track_script {
      haproxy_check
    }
 }
 vrrp_instance OCP1_APPS_LB {
    state BACKUP
    interface bond0.1302
    virtual_router_id 250
    priority 98
    virtual_ipaddress {
      172.24.58.150/24
    }
    track_script {
      haproxy_check
    }
 }
Open the necessary firewall ports for the load balancers and then reload the firewall configuration. Since SELinux is enabled, it is also necessary to set the boolean as shown.
# firewall-cmd --add-port 22623/tcp --permanent
# firewall-cmd --add-port 6443/tcp --permanent
# firewall-cmd --add-service https --permanent
# firewall-cmd --add-service http --permanent
# firewall-cmd --add-port 9000/tcp --permanent
# firewall-cmd --add-rich-rule='rule protocol value="vrrp" accept' --permanent
# firewall-cmd --reload

# setsebool -P haproxy_connect_any=1
On both nodes, enable and start haproxy and keepalived
# systemctl enable keepalived --now
# systemctl enable haproxy --now
The process of deploying Red Hat Openshift can now begin. This is performed on the CentOS jump host shown in the diagram at the top of this document.
From this link https://cloud.redhat.com/openshift/install/metal/user-provisioned download the Openshift Installer, Command Line Tools and the RHCOS ISO image.
Extract the Openshift installation tool openshift-install
# tar xf openshift-install-linux.tar.gz
Extract the command line tools oc and kubectl and copy them to a directory in the $PATH
# tar xf openshift-client-linux.tar.gz
# cp oc /usr/local/bin/
# cp kubectl /usr/local/bin/
# oc version
Client Version: 4.7.9
# kubectl version
Client Version: version.Info{Major:"1", Minor:"20", GitVersion:"v1.20.1-5-g76a04fc", GitCommit:"95881afb5df065c250d98cf7f30ee4bb6d281acf", GitTreeState:"clean", BuildDate:"2021-04-25T08:15:25Z", GoVersion:"go1.15.7", Compiler:"gc", Platform:"linux/amd64"}
Generate an ssh key and start the ssh-agent as a background process
# ssh-keygen -t ed25519 -N '' -f ~/.ssh/id_rsa
# eval "$(ssh-agent -s)"
Create the install-config.yaml file in a dedicated installation directory. There are good examples of this file in the Openshift documentation. A pull-secret will be necessary and can be downloaded from Red Hat, the sshKey can be obtained from the ssh-keygen command run in the step above. One other thing to note is that the environment used here requires a proxy server for external access, this should be defined within this file if required.
# mkdir install_dir
# vi install_dir/install-config.yaml

apiVersion: v1
baseDomain: powerflex.local
proxy:
  httpProxy: http://10.36.65.59:3128
  httpsProxy: http://10.36.65.59:3128
  noProxy: localhost,127.0.0.1,10.36.0.0/16,172.24.58.0/24,.powerflex.local
compute:
- hyperthreading: Enabled
  name: worker
  replicas: 2
controlPlane:
  hyperthreading: Enabled
  name: master
  replicas: 3
metadata:
  name: ocp1
networking:
  clusterNetwork:
  - cidr: 10.128.0.0/14
    hostPrefix: 23
  networkType: OpenShiftSDN
  serviceNetwork:
  - 172.30.0.0/16
platform:
  none: {}
fips: false
pullSecret: '{"auths":{"cloud.openshift.com":{"auth":"*********************************************************************************************************************************************************************","email":"user@example.com"},"quay.io":"auth":"******************************************************************************************************************************************************************************************************************************************************************************************","email":"user@example.com"},"registry.connect.redhat.com":"auth":"******************************************************************************************************************************************************************************************************************************************************************************************","email":"user@example.com"},"registry.redhat.io":"auth":"******************************************************************************************************************************************************************************************************************************************************************************************","email":"user@example.com"}}}'
sshKey: 'ssh-ed25519 *********************************************** root@lnx1200.powerflex.local'
Make a backup of this file outside of the installation directory, the deployment will overwrite this file.
# cp install_dir/install-config.yaml BACKUP_install-config.yaml
Use the Openshift installation tool to create manifest files using the contents of the installation directory. View the resulting file/directory structure, using the tree command (if installed).
# ./openshift-install create manifests --dir=install_dir

# tree install_dir/
 install_dir/
 ├── manifests
 │   ├── 04-openshift-machine-config-operator.yaml
 │   ├── cluster-config.yaml
 │   ├── cluster-dns-02-config.yml
 │   ├── cluster-infrastructure-02-config.yml
 │   ├── cluster-ingress-02-config.yml
 │   ├── cluster-network-01-crd.yml
 │   ├── cluster-network-02-config.yml
 │   ├── cluster-proxy-01-config.yaml
 │   ├── cluster-scheduler-02-config.yml
 │   ├── cvo-overrides.yaml
 │   ├── etcd-ca-bundle-configmap.yaml
 │   ├── etcd-client-secret.yaml
 │   ├── etcd-metric-client-secret.yaml
 │   ├── etcd-metric-serving-ca-configmap.yaml
 │   ├── etcd-metric-signer-secret.yaml
 │   ├── etcd-namespace.yaml
 │   ├── etcd-service.yaml
 │   ├── etcd-serving-ca-configmap.yaml
 │   ├── etcd-signer-secret.yaml
 │   ├── kube-cloud-config.yaml
 │   ├── kube-system-configmap-root-ca.yaml
 │   ├── machine-config-server-tls-secret.yaml
 │   ├── openshift-config-secret-pull-secret.yaml
 │   └── openshift-kubevirt-infra-namespace.yaml
 └── openshift
     ├── 99_kubeadmin-password-secret.yaml
     ├── 99_openshift-cluster-api_master-user-data-secret.yaml
     ├── 99_openshift-cluster-api_worker-user-data-secret.yaml
     ├── 99_openshift-machineconfig_99-master-ssh.yaml
     ├── 99_openshift-machineconfig_99-worker-ssh.yaml
     └── openshift-install-manifests.yaml

 2 directories, 30 files
Use the Openshift installation tool to create the ignition files which will be used to deploy the various node types. Again the tree command can be used to view the resulting file/directory structure. Ignition files are generated for bootstrap, master and worker nodes.
# ./openshift-install create ignition-configs --dir=install_dir

# tree install_dir/
 install_dir/
 ├── auth
 │   ├── kubeadmin-password
 │   └── kubeconfig
 ├── bootstrap.ign
 ├── master.ign
 ├── metadata.json
 └── worker.ign

 1 directory, 6 files
During the deployment of the nodes, the ignition files are pulled from a web server, a dedicated web server was built on the CentOS jump server listening on port 8080 (configured in /etc/httpd/conf/httpd.conf). Once the web server is running, the ignition files need to be copied to it.
# dnf install -y httpd
# vi /etc/httpd/conf/httpd.conf
# systemctl enable httpd --now
# firewall-cmd --add-port=8080/tcp --permanent
# firewall-cmd --reload
# cp ~/install_dir/*.ign /var/www/html/
# chmod 755 /var/www/html/*.ign
# ll  /var/www/html
 total 292
 -rwxr-xr-x. 1 root root 290636 May 20 19:07 bootstrap.ign
 -rwxr-xr-x. 1 root root   1722 May 20 19:07 master.ign
 -rwxr-xr-x. 1 root root   1722 May 20 19:07 worker.ign
The bootstrap and master nodes should now each be booted from the RHCOS ISO file that was downloaded earlier, as the servers being used here are Dell PowerEdge, the iDRAC Virtual Media functionality was used for this purpose.
The next stage is possibly more complex than with some other storage solutions as it is necessary to not only configure the network to access the node but also to configure the networks to access the PowerFlex storage.
In line with current PowerFlex network best practice (although not compulsory), the networks were configured into two LACP bonds.
The first (bond0) using ports eno1 (port 1 on the Network Daughter Card) and ens1f0 (port 1 on the dual port PCIe network card), on top of this bond a VLAN tagged interface is created on the node management network.
The second (bond1) using ports eno2 (port 2 on the Network Daughter Card) and ens1f1 (port 2 on the dual port PCIe network card), on top of this bond four VLAN tagged interfaces are created which connect to the four data networks.
In summary:
bond0 – (eno1, ens1f0)
bond0.1302 172.24.58.2x/24 Default Gateway: 172.24.58.1
DNS Servers: 172.24.58.156 172.24.58.157 Search Domain: ocp1.powerflex.local
bond1 – (eno2, ens1f1)
bond1.151 192.168.151.12x/24
bond1.152 192.168.152.12x/24
bond1.153 192.168.153.12x/24
bond1.154 192.168.154.12x/24
Most of this networking was configured on each host using nmtui but there appears to be no way to configure the required LACP settings hence the two nmtui commands below were used – note: it is possible to use nmcli for the entire process but unfortunately I am not familiar enough with the tool to do this 🙁
(The sudo dmesg -n 1 command is important to prevent the screen filling with lots of messages).
$ sudo dmesg -n 1
$ nmtui
$ sudo nmcli con mod id bond0 bond.options mode=802.3ad,miimon=100,lacp_rate=fast,xmit_hash_policy=layer2+3
$ sudo nmcli con mod id bond1 bond.options mode=802.3ad,miimon=100,lacp_rate=fast,xmit_hash_policy=layer2+3
On Bootstrap node, run the lsblk command to confirm which device should be used as the boot disk, then use the coreos-installer to copy a boot image from the current memory resident environment to the disk. The –copy-network option ensures that the network changes made above are also applied and the –ignition-url should point to the appropriate ignition file on the web server. The –insecure-ignition is required because http is being used, not https. In the example here the boot device is /dev/sdz, this is due there being a lot of disks in this server that are not being used for this deployment. During the reboot process, detach the Virtual Media from the iDRAC to ensure the node boots from the local disk and not the ISO image.
$ sudo lsblk
$ sudo coreos-installer install --copy-network --ignition-url=http://172.24.58.200:8080/bootstrap.ign --insecure-ignition /dev/sdz
$ sudo reboot
Repeat the process on the master nodes but of course with the –ignition-url pointing to the ignition file for the master nodes.
$ sudo lsblk
$ sudo coreos-installer install --copy-network --ignition-url=http://172.24.58.200:8080/master.ign --insecure-ignition /dev/sdz
$ sudo reboot
The bootstrap process can now be monitored from the jump box
# ./openshift-install --dir=install_dir wait-for bootstrap-complete --log-level=debug
 DEBUG OpenShift Installer 4.7.9
 DEBUG Built from commit fae650e24e7036b333b2b2d9dfb5a08a29cd07b1
 INFO Waiting up to 20m0s for the Kubernetes API at https://api.ocp1.powerflex.local:6443...
 DEBUG Still waiting for the Kubernetes API: an error on the server ("") has prevented the request from succeeding
 INFO API v1.20.0+7d0a2b2 up
 INFO Waiting up to 30m0s for bootstrapping to complete...
 DEBUG Bootstrap status: complete
 INFO It is now safe to remove the bootstrap resources
 DEBUG Time elapsed per stage:
 DEBUG Bootstrap Complete: 15m6s
 DEBUG                API: 2m24s
 INFO Time elapsed: 15m6s
When the bootstrap process has completed successfully, reboot the bootstrap node from the RHCOS ISO image in readiness to convert it to a worker node. On each of the load balancer nodes, the lines in /etc/haproxy/haproxy.cfg for the bootstrap node should now be commented out and haproxy restarted
# vi /etc/haproxy/haproxy.cfg
.
.
 backend api
     option httpchk GET /healthz
     http-check expect status 200
     mode tcp
     balance roundrobin
  #   server bootstrap 172.24.58.20:6443 check check-ssl verify none # Comment out once bootstrap complete
     server master0 172.24.58.21:6443 check check-ssl verify none
     server master1 172.24.58.22:6443 check check-ssl verify none
     server master2 172.24.58.23:6443 check check-ssl verify none
.
.
 backend api-int
     mode tcp
     balance roundrobin
 #    server bootstrap 172.24.58.20:22623 check # Comment out once bootstrap complete
     server master0 172.24.58.21:22623 check
     server master1 172.24.58.22:22623 check
     server master2 172.24.58.23:22623 check
.
.

# systemctl restart haproxy
The Openshift Command Line tool can now be used to examine the cluster, first set the KUBECONFIG variable, for a more permanent solution, add to bash_profile or similar. The nodes should all have a status of Ready
# export KUBECONFIG=$HOME/install_dir/auth/kubeconfig
# oc get nodes
 NAME                           STATUS   ROLES           AGE   VERSION
 master0.ocp1.powerflex.local   Ready    master,worker   12m   v1.20.0+7d0a2b2
 master1.ocp1.powerflex.local   Ready    master,worker   12m   v1.20.0+7d0a2b2
 master2.ocp1.powerflex.local   Ready    master,worker   12m   v1.20.0+7d0a2b2
Check that all operators in the cluster are showing as available.
# oc get co
 NAME                                       VERSION   AVAILABLE   PROGRESSING   DEGRADED   SINCE
 authentication                             4.7.9     True        False         False      7m18s
 baremetal                                  4.7.9     True        False         False      39m
 cloud-credential                           4.7.9     True        False         False      46m
 cluster-autoscaler                         4.7.9     True        False         False      38m
 config-operator                            4.7.9     True        False         False      39m
 console                                    4.7.9     True        False         False      7m5s
 csi-snapshot-controller                    4.7.9     True        False         False      38m
 dns                                        4.7.9     True        False         False      38m
 etcd                                       4.7.9     True        False         False      38m
 image-registry                             4.7.9     True        False         False      33m
 ingress                                    4.7.9     True        False         False      32m
 insights                                   4.7.9     True        False         False      33m
 kube-apiserver                             4.7.9     True        False         False      36m
 kube-controller-manager                    4.7.9     True        False         False      37m
 kube-scheduler                             4.7.9     True        False         False      37m
 kube-storage-version-migrator              4.7.9     True        False         False      18m
 machine-api                                4.7.9     True        False         False      38m
 machine-approver                           4.7.9     True        False         False      38m
 machine-config                             4.7.9     True        False         False      37m
 marketplace                                4.7.9     True        False         False      18m
 monitoring                                 4.7.9     True        False         False      17m
 network                                    4.7.9     True        False         False      39m
 node-tuning                                4.7.9     True        False         False      38m
 openshift-apiserver                        4.7.9     True        False         False      18m
 openshift-controller-manager               4.7.9     True        False         False      37m
 openshift-samples                          4.7.9     True        False         False      32m
 operator-lifecycle-manager                 4.7.9     True        False         False      38m
 operator-lifecycle-manager-catalog         4.7.9     True        False         False      38m
 operator-lifecycle-manager-packageserver   4.7.9     True        False         False      19m
 service-ca                                 4.7.9     True        False         False      39m
 storage                                    4.7.9     True        False         False      39m
Check the status of the Openshift environment by browsing to the console at
https://console.openshift-console.apps.ocp1.powerflex.local
Use kubeadmin for the username and the password found in install_dir/auth/kubeadmin-password

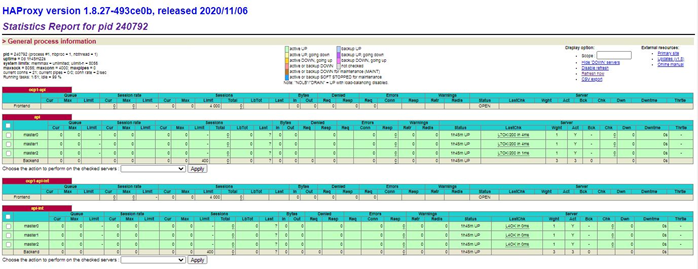
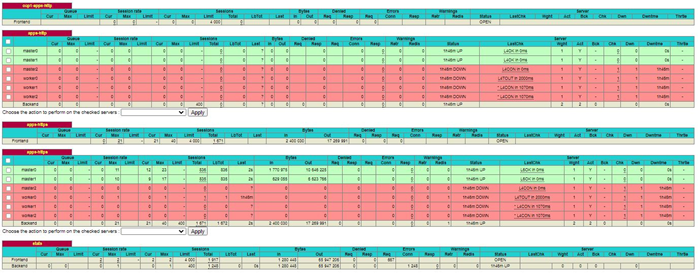
At this point the statistical reporting capabilities of haproxy can be used, the upper screenshot below shows that both the api and api-int backends are green across all three master nodes. The lower screenshot shows the apps-http and apps-https as green on two of the master nodes and red on the workers and one of the master nodes, we will fix this in subsequent steps.
The worker nodes can now be added to the cluster. Boot RHCOS ISO on all three worker nodes (one of which was formerly the bootstrap node).
Configure the network in the same way as was done with the bootstrap and master nodes using nmtui/nmcli.
$ sudo dmesg -n 1
$ nmtui
$ sudo nmcli con mod id bond0 bond.options mode=802.3ad,miimon=100,lacp_rate=fast,xmit_hash_policy=layer2+3
$ sudo nmcli con mod id bond1 bond.options mode=802.3ad,miimon=100,lacp_rate=fast,xmit_hash_policy=layer2+3
List disks and copy image to boot disk, ensuring the –ignition-url points to the worker ignition file. Disconnect the Virtual Media from the iDRAC during the reboot.
$ sudo lsblk
$ sudo coreos-installer install --copy-network --ignition-url=http://172.24.58.200:8080/worker.ign --insecure-ignition /dev/sdz
$ sudo reboot
Worker nodes will boot but not join cluster until certificates have been approved. From the CentOS jump server, list the status of the certificates.
# oc get csr
 NAME        AGE    SIGNERNAME                                    REQUESTOR                                                                   CONDITION
 csr-2dcd4   26m    kubernetes.io/kube-apiserver-client-kubelet   system:serviceaccount:openshift-machine-config-operator:node-bootstrapper   Pending
 csr-2g9mk   17m    kubernetes.io/kube-apiserver-client-kubelet   system:serviceaccount:openshift-machine-config-operator:node-bootstrapper   Pending
 csr-59pm8   2m2s   kubernetes.io/kube-apiserver-client-kubelet   system:serviceaccount:openshift-machine-config-operator:node-bootstrapper   Pending
 csr-bb2w9   72m    kubernetes.io/kube-apiserver-client-kubelet   system:serviceaccount:openshift-machine-config-operator:node-bootstrapper   Pending
 csr-bstsn   32m    kubernetes.io/kube-apiserver-client-kubelet   system:serviceaccount:openshift-machine-config-operator:node-bootstrapper   Pending
 csr-gmwfx   41m    kubernetes.io/kube-apiserver-client-kubelet   system:serviceaccount:openshift-machine-config-operator:node-bootstrapper   Pending
 csr-hg2f7   87m    kubernetes.io/kube-apiserver-client-kubelet   system:serviceaccount:openshift-machine-config-operator:node-bootstrapper   Pending
 csr-knf58   102m   kubernetes.io/kube-apiserver-client-kubelet   system:serviceaccount:openshift-machine-config-operator:node-bootstrapper   Pending
 csr-qld2x   56m    kubernetes.io/kube-apiserver-client-kubelet   system:serviceaccount:openshift-machine-config-operator:node-bootstrapper   Pending
 csr-qtttf   71s    kubernetes.io/kube-apiserver-client-kubelet   system:serviceaccount:openshift-machine-config-operator:node-bootstrapper   Pending
 csr-v5mv6   10m    kubernetes.io/kube-apiserver-client-kubelet   system:serviceaccount:openshift-machine-config-operator:node-bootstrapper   Pending
Approve all certificates.
# oc adm certificate approve `oc get csr | awk '{print $1}'`
# oc get csr -o name | xargs oc adm certificate approve
Initially the worker nodes will be listed as Not Ready, becoming Ready after a few minutes.
# oc get nodes
 NAME                           STATUS     ROLES           AGE    VERSION
 master0.ocp1.powerflex.local   Ready      master,worker   4h7m   v1.20.0+7d0a2b2
 master1.ocp1.powerflex.local   Ready      master,worker   4h7m   v1.20.0+7d0a2b2
 master2.ocp1.powerflex.local   Ready      master,worker   4h7m   v1.20.0+7d0a2b2
 worker0.ocp1.powerflex.local   NotReady   worker          26s    v1.20.0+7d0a2b2
 worker1.ocp1.powerflex.local   NotReady   worker          35s    v1.20.0+7d0a2b2
 worker2.ocp1.powerflex.local   NotReady   worker          27s    v1.20.0+7d0a2b2

# oc get nodes
 NAME                           STATUS   ROLES           AGE     VERSION
 master0.ocp1.powerflex.local   Ready    master,worker   4h9m    v1.20.0+7d0a2b2
 master1.ocp1.powerflex.local   Ready    master,worker   4h8m    v1.20.0+7d0a2b2
 master2.ocp1.powerflex.local   Ready    master,worker   4h9m    v1.20.0+7d0a2b2
 worker0.ocp1.powerflex.local   Ready    worker          2m19s   v1.20.0+7d0a2b2
 worker1.ocp1.powerflex.local   Ready    worker          2m28s   v1.20.0+7d0a2b2
 worker2.ocp1.powerflex.local   Ready    worker          2m20s   v1.20.0+7d0a2b2
The cluster is now fully configured with three nodes running as master/worker nodes and three as worker nodes, clearly this is a very small environment and this setup would be fine. In a larger environment, the best practice would be to have three dedicated master nodes and multiple worker nodes. In order to achieve this scenario, the ingress controllers are moved from the master nodes to the worker nodes and configured to have three instances, the master nodes are also set so that pods can not be scheduled on them.
# oc patch -n openshift-ingress-operator ingresscontroller/default --patch '{"spec":{"nodePlacement": {"nodeSelector":{"matchLabels":{"node-role.kubernetes.io/worker": "" }}}}}' --type=merge

# oc patch -n openshift-ingress-operator ingresscontroller/default --patch
'{"spec":{"replicas": 3}}' --type=merge

# oc edit scheduler

# Please edit the object below. Lines beginning with a '#' will be ignored,
# and an empty file will abort the edit. If an error occurs while saving this file will be
# reopened with the relevant failures.
#
 apiVersion: config.openshift.io/v1
 kind: Scheduler
 metadata:
   creationTimestamp: "2021-05-20T16:58:12Z"
   generation: 1
   name: cluster
   resourceVersion: "540"
   selfLink: /apis/config.openshift.io/v1/schedulers/cluster
   uid: 90b0d66a-0c05-4a05-9360-34b8a40cb9a0
 spec:
   mastersSchedulable: false
   policy:
     name: ""
 status: {}

# oc get nodes
 NAME                           STATUS   ROLES    AGE     VERSION
 master0.ocp1.powerflex.local   Ready    master   4h26m   v1.20.0+7d0a2b2
 master1.ocp1.powerflex.local   Ready    master   4h26m   v1.20.0+7d0a2b2
 master2.ocp1.powerflex.local   Ready    master   4h26m   v1.20.0+7d0a2b2
 worker0.ocp1.powerflex.local   Ready    worker   19m     v1.20.0+7d0a2b2
 worker1.ocp1.powerflex.local   Ready    worker   19m     v1.20.0+7d0a2b2
 worker2.ocp1.powerflex.local   Ready    worker   19m     v1.20.0+7d0a2b2
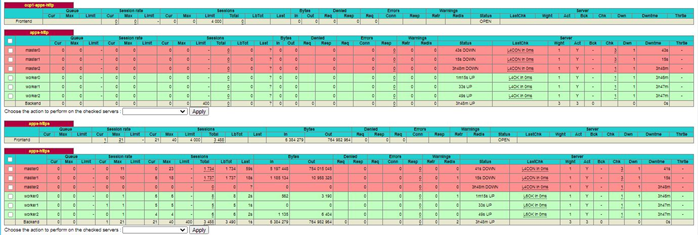
Now if the haproxy stats are examined, the apps-http and apps-https backends are active on the worker nodes only.
The /etc/haproxy/haproxy.cfg file on each load balancer node should now be edited so that the master nodes are either no longer listed in the apps-http/apps-https backends or commented out as below. Then restart haproxy
# vi /etc/haproxy/haproxy.cfg
.
.
backend apps-http
     mode tcp
     balance roundrobin
     # server master0 172.24.58.21:80 check  # Added as initially master nodes are master/worker nodes
     # server master1 172.24.58.22:80 check  # Added as initially master nodes are master/worker nodes
     # server master2 172.24.58.23:80 check  # Added as initially master nodes are master/worker nodes
     server worker0 172.24.58.24:80 check
     server worker1 172.24.58.25:80 check
     server worker2 172.24.58.26:80 check
.
.
  backend apps-https
     mode tcp
     balance roundrobin
     option ssl-hello-chk
     # server master0 172.24.58.21:443 check  # Added as initially master nodes are master/worker nodes
     # server master1 172.24.58.22:443 check  # Added as initially master nodes are master/worker nodes
     # server master2 172.24.58.23:443 check  # Added as initially master nodes are master/worker nodes
     server worker0 172.24.58.24:443 check
     server worker1 172.24.58.25:443 check
     server worker2 172.24.58.26:443 check
.
.

# systemctl restart haproxy
After this is done, only the worker nodes are listed under the apps-http and apps-https backends

The cluster is now ready for the installation of the PowerFlex CSI driver. This example installation was performed with version 1.4 of the CSI driver, as with everything in this space, things are evolving very quickly and the installation processes may have changed for more recent versions.
On the CentOS jump server, clone the Dell CSI Operator from Git Hub
# git clone https://github.com/dell/dell-csi-operator

 Cloning into 'dell-csi-operator'...
 remote: Enumerating objects: 244, done.
 remote: Counting objects: 100% (244/244), done.
 remote: Compressing objects: 100% (122/122), done.
 remote: Total 244 (delta 163), reused 190 (delta 120), pack-reused 0
 Receiving objects: 100% (244/244), 145.39 KiB | 306.00 KiB/s, done.
 Resolving deltas: 100% (163/163), done.

# cd dell-csi-operator
Create a namespace for PowerFlex
# oc create ns powerflex
Create the configmap required by the installation
# tar -czf config.tar.gz driverconfig/
# oc create configmap dell-csi-operator-config --from-file config.tar.gz -n powerflex
Next create config.json to be used by the installer, some important points to highlight, the username/password are to connect to the PowerFlex Gateway which acts as the REST API endpoint, the https://172.24.188.21 refers to this Gateway. The systemID is the name or ID of the PowerFlex cluster, this can be supplied by the PowerFlex administrator, along with the MDM IP addresses on the final line.
# vi config.json

[
    {
        "username": "admin",
        "password": "ScaleIO123!",
        "systemID": "powerflexgw1",
        "endpoint": "https://172.24.188.21",
        "insecure": true,
        "isDefault": true,
        "mdm": "192.168.151.22,192.168.152.22,192.168.153.22,192.168.154.22"
    }
]
Create a secret using config.json
# oc create secret generic vxflexos-config -n powerflex --from-file=config=config.json
Use the Openshift operator hub to install the Dell CSI Operator. Within the Openshift dashboard, select OperatorHub
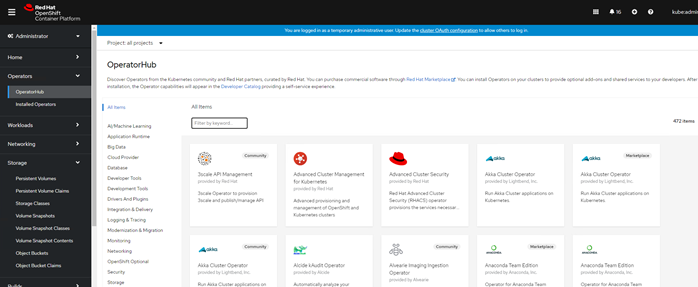
In the search box, enter dell

Select the Dell CSI Operator and click Install
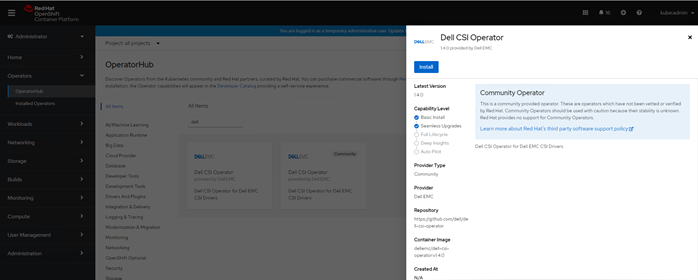
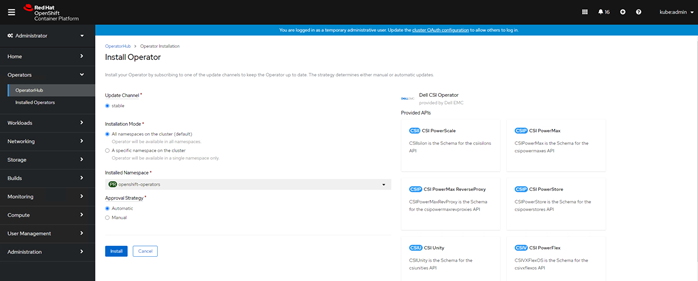
The default settings should be sufficient, click Install at the bottom of the page.
Within the samples directory, there are a set of yaml files covering the various storage platforms and versions of the CSI driver for both bare metal Kubernetes and Openshift. This deployment is on PowerFlex (vxflex) with the CSI driver 1.4 (140) on Openshift 4.6 (ops_46), copy the vxflex_140_ops_46.yaml file from the samples directory to the current working directory. Edit the file, making the changes suggested in the notes, the only changes required should be the system name setting.
# cp samples/vxflex_140_ops_46.yaml .
# vi vxflex_140_ops_46.yaml

apiVersion: storage.dell.com/v1
kind: CSIVXFlexOS
metadata:
  name: powerflex
  namespace: powerflex
spec:
  driver:
    configVersion: v4
    replicas: 2
    forceUpdate: false
    common:
      image: "dellemc/csi-vxflexos:v1.4.0"
      imagePullPolicy: IfNotPresent
      envs:
        - name: X_CSI_VXFLEXOS_ENABLELISTVOLUMESNAPSHOT
          value: "false"
        - name: X_CSI_VXFLEXOS_ENABLESNAPSHOTCGDELETE
          value: "false"
        - name: X_CSI_DEBUG
          value: "true"
        - name: X_CSI_ALLOW_RWO_MULTI_POD_ACCESS
          value: "false"
    #sideCars:
    # Uncomment the following section if you want to run the monitoring sidecar
    #  - name: sdc-monitor
    #    envs:
    #    - name: HOST_PID
    #      value: "1"
    #    - name: MDM
    #      value: ""
    initContainers:
      - image: dellemc/sdc:3.5.1.1-1
        imagePullPolicy: IfNotPresent
        name: sdc
        envs:
          - name: MDM
            value: ""

    storageClass:
      - name: powerflex-vol
        default: true
        reclaimPolicy: Delete
        allowVolumeExpansion: true
        parameters:
          storagepool: SP-1
        allowedTopologies:
        - matchLabelExpressions:
        # Replace X_CSI_VXFLEXOS_SYSTEMNAME with its value
          - key: csi-vxflexos.dellemc.com/powerflexgw1
            values:
            - csi-vxflexos.dellemc.com
      - name: powerflex-xfs
        default: false
        reclaimPolicy: Delete
        allowVolumeExpansion: true
        parameters:
          storagepool: SP-1
          FsType: xfs
        allowedTopologies:
        - matchLabelExpressions:
        # Replace X_CSI_VXFLEXOS_SYSTEMNAME with its value
          - key: csi-vxflexos.dellemc.com/powerflexgw1
            values:
            - csi-vxflexos.dellemc.com
    snapshotClass:
      - name: powerflex-snapclass
Apply the yaml file to the Openshift environment
# oc create -f vxflex_140_ops_46.yaml
Ensure that all required pods have successfully started and that none are displaying an error status.
# oc get pods -n powerflex
NAME                                   READY   STATUS    RESTARTS   AGE
vxflexos-controller-5d7c76d547-8lqmb   5/5     Running   0          88m
vxflexos-controller-5d7c76d547-9nvq6   5/5     Running   0          88m
vxflexos-node-g5mzt                    2/2     Running   0          88m
vxflexos-node-hj8zf                    2/2     Running   0          88m
vxflexos-node-lkwnd                    2/2     Running   0          88m
Ensure the PowerFlex Storage Classes have been created
# oc get sc
NAME                                PROVISIONER                RECLAIMPOLICY   VOLUMEBINDINGMODE      ALLOWVOLUMEEXPANSION   AGE
powerflex-powerflex-vol (default)   csi-vxflexos.dellemc.com   Delete          WaitForFirstConsumer   true                   107m
powerflex-powerflex-xfs             csi-vxflexos.dellemc.com   Delete          WaitForFirstConsumer   true                   107m
The environment is now ready to be used, persistent volume claims may be created from the PowerFlex storage pools.
I hope you enjoy reading this and find it useful. If you have any feedback/comments/questions, please feel free to direct them to me.

Hello, is their a new version of your article for the latest PowerFlex Racks?
Hi
There is not an updated version as fundamentally, the process is very similar, whichever version is running. In addition to this, Dell has now released the APEX Cloud Platform for Red Hat OpenShift which automates much of what is documented above and also adds the option of lifecycling the installation.